Installation Guide
Squash Orchestrator†
Installation
Squash Orchestrator is a set of services running together. They may or may not run on the same machine, and they may or may not be started at the same time.
The only prerequisite is that the EventBus, the service they use to communicate together, is available when they launch.
To facilitate the installation of the orchestrator, an ‘all-in-one’ docker image is provided. It contains all core services (part of the OpenTestFactory Orchestrator) and some Squash specific services.
To get the latest image of Squash Orchestrator, use the following command:
docker pull squashtest/squash-orchestrator:latest
Usage
Configuring the ‘all-in-one’ image
The execution of the following command will start the Squash Orchestrator using an existing execution environment, with self-generated trusted keys (which is not recommended in a production setup):
docker run -d \
         --name orchestrator \
         -p 7774:7774 \
         -p 7775:7775 \
         -p 7776:7776 \
         -p 38368:38368 \
         -e SSH_CHANNEL_HOST=the_environment_ip_or_hostname \
         -e SSH_CHANNEL_USER=user \
         -e SSH_CHANNEL_PASSWORD=secret \
         -e SSH_CHANNEL_TAGS=ssh,linux,robotframework \
          squashtest/squash-orchestrator:latest
It exposes the following services on the corresponding ports:
- receptionnist (port 7774)
- observer (port 7775)
- killswitch (port 7776)
- eventbus (port 38368)
Run the image in Premium mode
If you have a Premium license for Squash AUTOM and have deployed the Premium version of the Result Publisher Squash TM plugin, you must run Squash Orchestrator in Premium mode in order to have access to Premium behavior for result publishing in Squash TM.
In order to do that, you have to add the following parameter in the Squash Orchestrator's run command: -e SQUASH_LICENCE_TYPE=premium
For more details about Squash Orchestrator configuration, please check the OpenTestFactory Orchestrator documentation on which Squash Orchestrator is based.
Orchestrator tools†
Installation
The orchestrator tools aim at simplifying the use of that one.
They require Python 3.8 or later. They are usable on Lunix, maxOS or Windows.
They can be installed using the following command:
pip3 install --upgrade opentf-tools
Overview of the tool capabilities
-
opentf-readywaits until the orchestrator is ready to accept workflows. -
opentf-donewaits until the orchestrator can be safely stopped (i.e. it has no more pending tasks). -
opentf-ctlcan be used to- start a workflow
- stop a workflow
- cancel a workflow
- generate a signed token
- list the subscriptions on the event bus
Docker image of Premium exclusive micro-services
Installation
To install the Docker image of Squash AUTOM Premium exclusive micro-services, you must get the compressed image from Squash support service. Then you have to execute the following command:
docker load -i squash-autom-premium-3.0.0.tar.gz
Usage
To run this Docker image, the following command must be used:
docker run -e BUS_HOST=<IP or DNS name of event bus> \
           -e BUS_PORT=<port> -e BUS_TOKEN=<JWT token> \
           -e EXTERNAL_HOSTNAME=<IP of premium micro-services> \
           --volume /path/to/truststore:/etc/squashtf/ \
           --volume /chemin/vers/dossier/temporaire:/tmp/ \
           squash-autom-premium:3.0.0
with:
-
BUS_HOST (mandatory): IP address or DNS name of EventBus service of the Squash Orchestrator with which micro-services communicate.
-
BUS_PORT (mandatory): port of EventBus service of the Squash Orchestrator with which micro-services communicate.
-
BUS_TOKEN (optionnal): JWT token accepted by the EventBus service of the Squash Orchestrator with which micro-services communicate.
-
EXTERNAL_HOSTNAME (optionnal): IP address or DNS name of Squash AUTOM exclusive micro-services.
-
--volume /etc/squashtf/: create a volume to a truststore with trusted public keys that can be used to validate JWT tokens. The volume must be created if JWT token validation is required to exchange messages between micro-services.
-
--volume /tmp/: create a volume to a folder shared with Squash Orchestrator to put temporary files generated while executing an execution plan.
OpenTestFactory Agent†
Installation
The OpenTestFactory agent is a Python application that is installed in the execution environment. It requires Python 3.8 or higher. It works on Linux, macOS, and Windows.
The agent is a simple script. It only has one external dependency, the well known requests library (it will be installed if not already present on the execution environment).
To install it, use the following command:
pip3 install --upgrade opentf-agent
You can test your installation by running the following command:
opentf-agent --help
Usage
Summary
$ opentf-agent --help
usage: opentf-agent [-h] --tags TAGS --host HOST [--port PORT] [--path_prefix PATH_PREFIX] [--token TOKEN] [--encoding ENCODING] [--script_path SCRIPT_PATH] [--workspace_dir WORKSPACE_DIR] [--name NAME] [--polling_delay POLLING_DELAY] [--liveness_probe LIVENESS_PROBE] [--retry RETRY] [--debug]

OpenTestFactory Agent

optional arguments:
  -h, --help            show this help message and exit
  --tags TAGS           a comma-separated list of tags (e.g. windows,robotframework)
  --host HOST           target host with protocol (e.g. https://example.local)
  --port PORT           target port (default to 24368)
  --path_prefix PATH_PREFIX
                        target context path (default to no context path)
  --token TOKEN         token
  --encoding ENCODING   encoding on the console side (defaults to utf-8)
  --script_path SCRIPT_PATH
                        where to put temporary files (defaults to current directory)
  --workspace_dir WORKSPACE_DIR
                        where to put workspaces (defaults to current directory)
  --name NAME           agent name (defaults to "test agent")
  --polling_delay POLLING_DELAY
                        polling delay in seconds (default to 5)
  --liveness_probe LIVENESS_PROBE
                        liveness probe in seconds (default to 300 seconds)
  --retry RETRY         how many time to try joining host (default to 5,
                      0 = try forever)
  --debug               whether to log debug informations.
Example
Assuming there is a Squash Orchestrator running on orchestrator.example.com, with a known token stored in the TOKEN environment variable, the following command will register the Windows-based execution environment and will possibly receive commands from Squash Orchestrator targeting windows and/or robotframework tagged environments:
chcp 65001
opentf-agent --tags windows,robotframework --host http://orchestrator.example.com/ --token %TOKEN%
The agent will poll the Orchestrator every 5 seconds, and will execute the received commands. The chcp command sets the console to Unicode. It is Windows-specific. It is not mandatory but may be needed depending on the test framework available in the execution environment.
Squash TM plugins
Installation
For details on the installation, please refer to the installation protocol of a Squash TM plugin.
Compatibility of the plugins
-
Result Publisher†
Versions 1.X.X are compatible with Squash TM 1.22.X versions, starting with 1.22.2 version.
Versions 2.0.X are compatible with 2.0.X versions.
Versions 2.1.X are compatible with 2.1.0, or later. -
Squash AUTOM
Versions 1.X.X are compatible with Squash TM 1.22.X versions, starting with 1.22.2 version.
Versions 2.X.X are compatible with 2.0.0, or later. -
Git Connector
Versions 1.X.X are compatible with Squash TM 1.22.X versions, starting with 1.22.2 version.
Versions 2.X.X are compatible with 2.0.0, or later. -
Actions Library
Versions 1.X.X are compatible with Squash TM 1.22.X versions, starting with 1.22.2 version.
Versions 2.X.X are compatible with 2.0.0, or later. -
Workflow Automatisation Jira
Versions 1.X.X are compatible with Squash TM 1.22.X versions, starting with 1.22.2 version.
Versions 2.X.X are compatible with 2.0.0, or later.
Squash TM configuration
Squash Orchestrator server declaration
In order to manually launch an execution plan from Squash TM, the Squash Orchestrator server that will execute the automated tests in the suitable environments has to be declared.
It is done in the Automation servers space of the Administration:

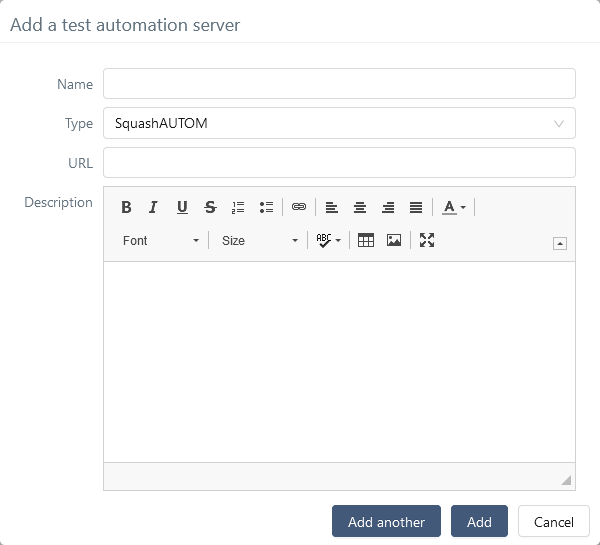
-
Name: The name of server, as it will appear in the Test Case workspace. -
Type: Select squashAutom in the dropdown list. -
Url: The address of the Squash Orchestrator Receptionist.
Attention
The Squash Orchestrator event bus service must be accessible by the same URL as the Receptionnist, on port 38368.
Once the server is created, you can set an authentication token.
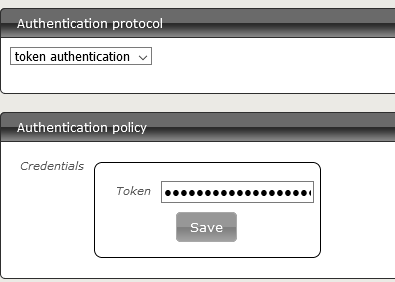
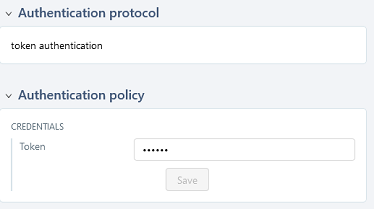
Focus
A token is mandatory for the execution of automated tests from Squash TM. If the automation server does not require authentication token, you still have to set some value in Squash TM.
Squash TM project configuration
Once an automation server has been declared, it needs to be link to a Squash TM Project in order to be used for project's automated tests execution.
In order to do that, follow these steps:
-
Click on
[Administration]then click on[Projects]. -
Select an existing project, scroll down to
Test automation management.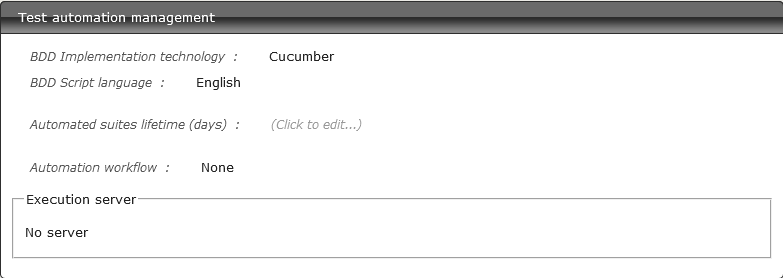
-
Click on
No server. You'll see the list of available servers.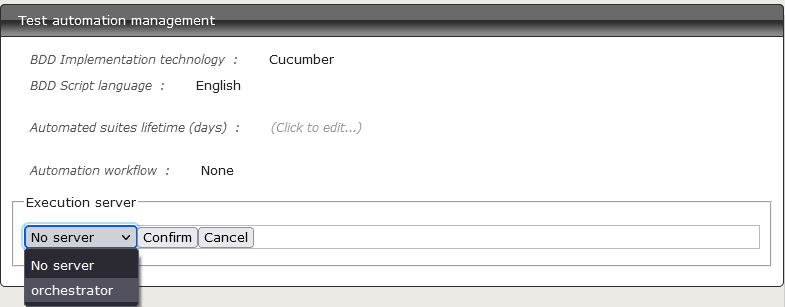
-
Choose the server and
[Confirm].
-
Click on
[Administration]then click on[Projects]. -
Select an existing project, scroll down to
Test automation management.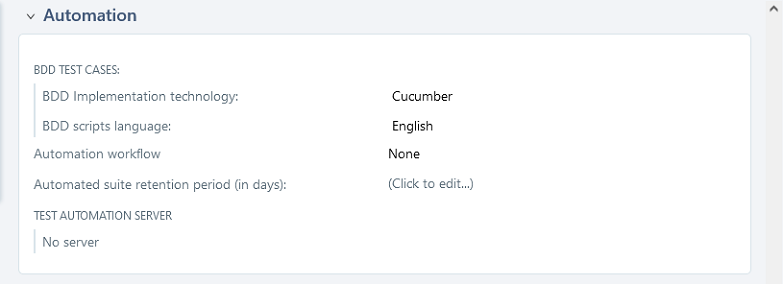
-
Click on
No server. You'll see the list of available servers.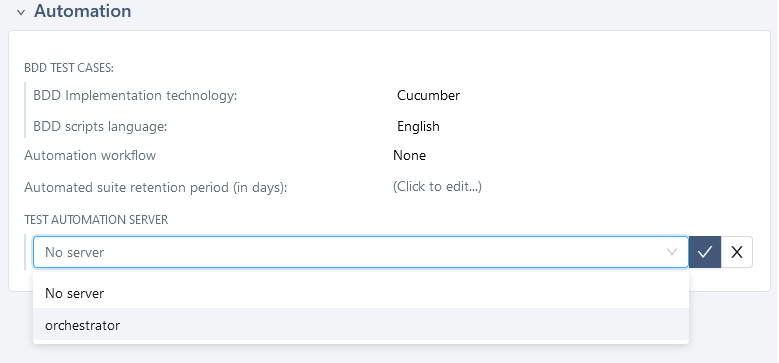
-
Choose the server and confirm.
† indicates a component which is common to Squash AUTOM and Squash DEVOPS. It must be installed only once.