Piloting automated tests executions from Squash TM
Info
To pilote automated tests executions from Squash TM, following components are required:
- Squash TM
- Squash Orchestrator
- Result Publisher Plugin for Squash TM
- Squash AUTOM plugin for Squash TM
- In case of Agilitest test execution : an OpenTestFactory agent for Agilitest execution environment
- In case of Ranorex test execution : an OpenTestFactory agent for Ranorex execution environment, and an environment variable called SQUASH_MSBUILD_PATH containing the path to the parent folder of MSBuild.exe
Squash TM test case automation
Info
This page describes the common operations to all supported test frameworks in this version. You can access the automation specificities for each technology directly with the following links :
Without using the Squash automation workflow
To execute a test case using the Squash Orchestrator, its Automation panel in the Information tab of the test case page must be correctly filled :
-
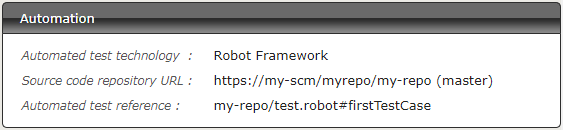
Automated test technology: A dropdown list allowing you to choose the technology used for the execution of a test case. In this version, only Robot Framework, Junit, Cucumber, Cypress, SoapUi, Agilitest and Ranorex are functioning. -
Source code repository URL: The address of the source code repository where the project is located, as referenced in the Source code management servers area of the Administration. -
Automated test reference: This is the location of the automated test within the project. This reference must follow the specific format of the used test technology (see here).
Info
Agilitest and Ranorex are only supported by the premium version of Squash AUTOM.
Using the Squash automation workflow
Regular test case
To execute a test case using the Squash Orchestrator, it must be automated in the Automation Workspace by filling three columns :

-
Auto. test tech.: A dropdown list allowing you to choose the technology used for the execution of a test case. In this version, only Robot Framework, Junit, Cucumber, Cypress, SoapUi, Agilitest and Ranorex are functioning. -
Scm URL: The address of the source code repository where the project is located. -
Auto. test ref.: This is the location of the automated test within the project. This reference must follow the specific format of the used test technology (see here).
Info
Agilitest and Ranorex are only supported by the premium version of Squash AUTOM.
BDD or Gherkin test case
The information of the Automation panel is automatically filled during the transmission of a BDD or Gherkin script to a remote source code repository hosting service. It can also be modified by the user at any moment.
Squash TM parameters exploitation
When a Squash TM execution plan is launched (through an EPAC or directly from the campaign workspace), Squash TM will transmit various information on ITPI that can be exploited by a Cucumber, Cypress, Robot Framework, Agilitest or Ranorex test case. Details of this functionality can be found on the corresponding used technology section
Automation frameworks specificities
Automation with Agilitest
1. Test reference
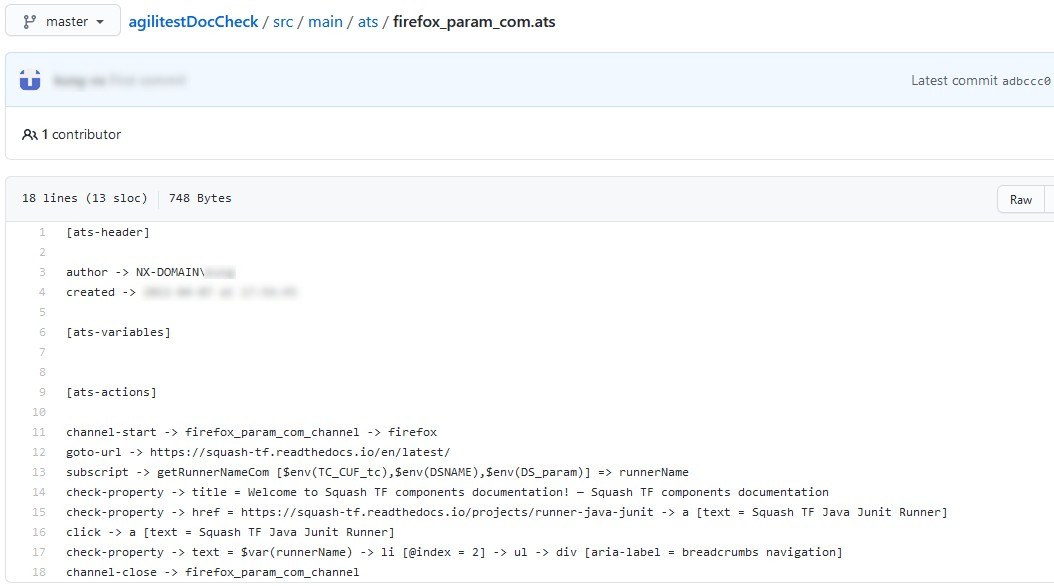
In order to bind a Squash TM test case to an Agilitest automated test, the content of the Automated test reference field of the Automation panel of a test case must have the following format :
[1] / [2]
With :
-
[1]: Name of the project on the source code repository. -
[2]: Path and name of the ActionTestScript file, from the root of the project (with the.atsextension).
Focus
The ATS script must be located in src/main/ats/* , as in any regular ATS project architecture.
2. Nature of the exploitable Squash TM parameters
The exploitable Squash TM parameters in an ActionTestScript script will differ depending on whether you're using the Community or Premium version of Squash DEVOPS.
Here is a table showing the exploitable parameters :
| Nature | Key | Community | Premium |
|---|---|---|---|
| Name of the dataset | DSNAME |  |
|
| Dataset parameter | DS_[name] | |
|
| Test case reference | TC_REF | |
|
| Test case CUF | TC_CUF_[code] | |
|
| Iteration CUF | IT_CUF_[code] |  |
|
| Campaign CUF | CPG_CUF_[code] | |
|
| Test suite CUF | TS_CUF_[code] | |
|
Legend :
CUF: Custom Field[code]: Value of a CUF's "Code" field[name]: Parameter name as filled in Squash TM
3. Squash TM parameters usage
When executing a Squash TM automated test case with Agilitest, it is possible to exploit the Squash TM parameters inside the test.
In order to achieve this, you'll have to follow these steps :
-
Create custom fields in Squash TM and bind them to the project bearing the test plan to execute.
-
Make sure that the code fields of the parameters correspond to the names of the existing environment variables present in the Cypress script.
Info
Squash TM adds a prefix to the code of the transmitted custom field. Make sure to take it into account. Please refer to the Squash TM documentation for more information.
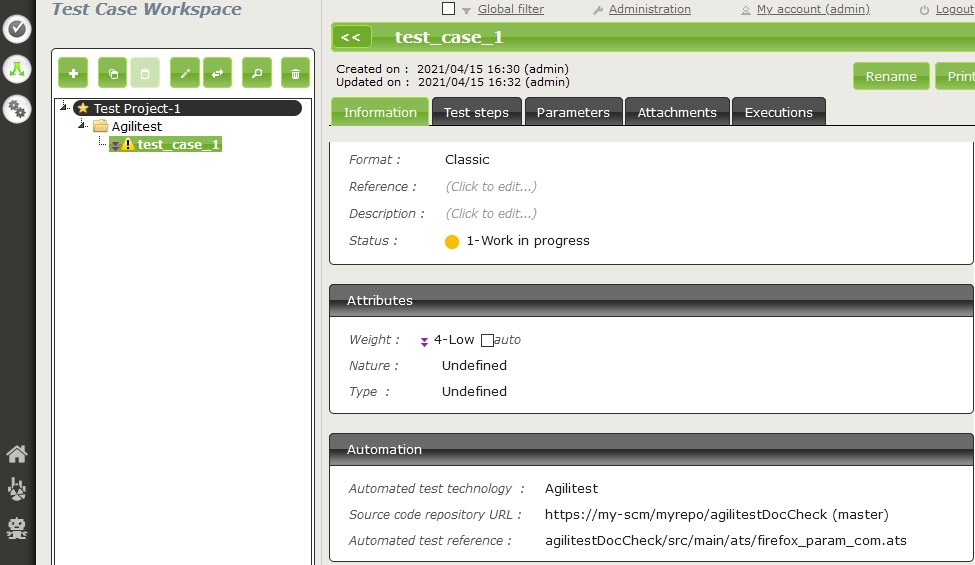
Below is an example of an Agilitest test file and the corresponding Squash TM test case automation :
Automation with Cucumber
1. Test reference
Info
If a scenario name is not specified, the result of each executed Squash TM test case is calculated by taking into account the individual results of each scenario included in the bound file :
-
If at least one scenario has an Error status (in case of a technical issue), the status of the execution will be Blocked.
-
If at least one scenario fails functionally and none of the other has an Error status, the status of the execution will be Failed.
-
If all scenarios succeed, the status of the execution will be Success.
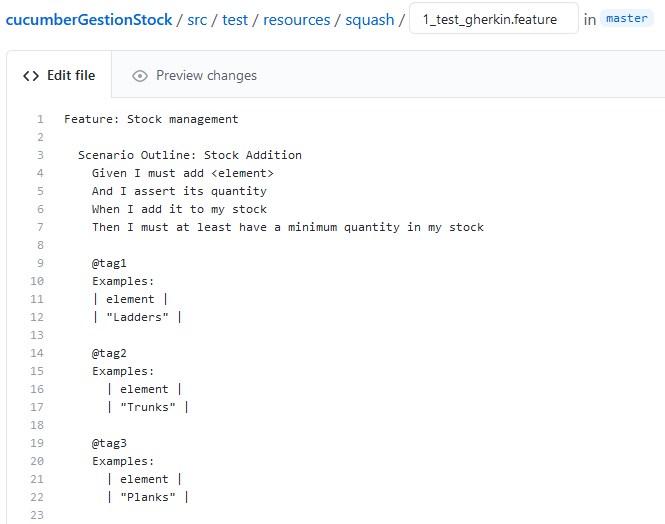
In order to bind a Squash TM test case to a Cucumber automated test, the content of the Automated test reference field of the Automation panel of a test case must have the following format :
[1] / [2] # [3] # [4]
With :
-
[1]: Name of the project on the source code repository. -
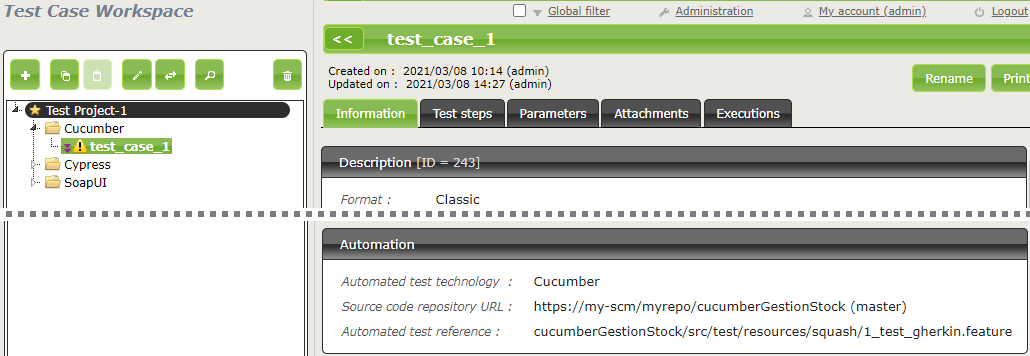
[2]: Path and name of the Cucumber test file, from the root of the project (with the.featureextension). -
[3]: feature name as specified in the Cucumber test file. -
[4]: scenario name as specified in the Cucumber test file.
2. Nature of the exploitable Squash TM parameters
Squash AUTOM and Squash DEVOPS are able to use the name of a Squash TM dataset as a tag value to use for the execution of a specific subset of a Cucumber feature.
Both Community and Premium versions can use dataset names.
3. Squash TM parameters usage
When executing a Squash TM automated test case with Cucumber, it is possible to exploit the Squash TM dataset name in order to execute a specific dataset of a Cucumber scenario.
In order to achieve this, you'll have to follow these steps :
-
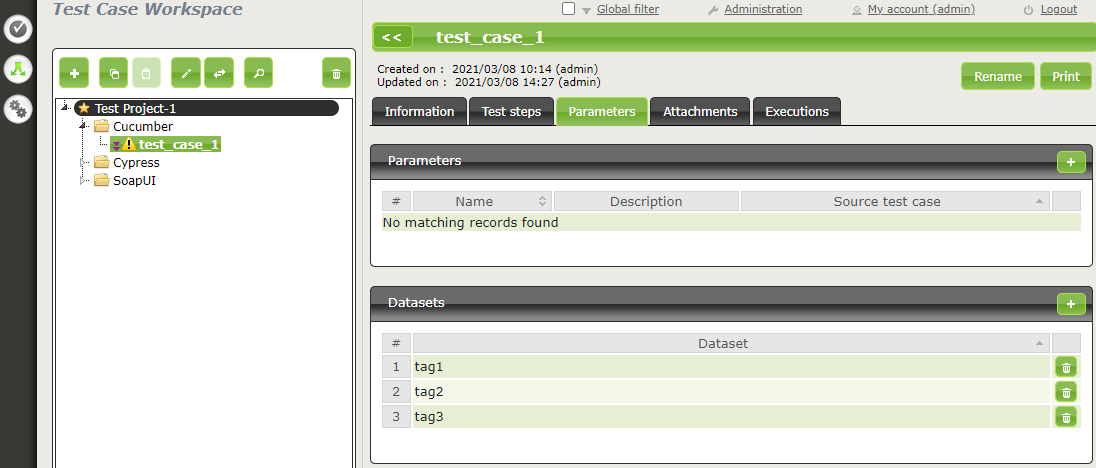
Fill the datasets in the Parameters tab of the test case in Squash TM.
-
Create in a Cucumber scenario as many example table as there are dataset in Squash TM test case. Annotate them with a tag corresponding to the name of a Squash TM dataset.
-
Create one line of elements in each example table to set scenario's parameters values for the dataset.
Below is an example of a Cucumber test file and the corresponding Squash TM test case automation :
Automation with Cypress
1. Test reference
Info
In this version of Squash AUTOM, it is not possible to select a specific scenario in a .spec.js file containing several ones : all scenarios in the file are therefore executed together. The result of each executed Squash TM test case is calculated by taking into account the individual results of each scenario included in the bound file :
-
If at least one scenario has an Error status (in case of a technical issue), the status of the execution will be Blocked.
-
If at least one scenario fails functionally and none of the other has an Error status, the status of the execution will be Failed.
-
If all scenarios succeed, the status of the execution will be Success.
In order to bind a Squash TM test case to a Cypress automated test, the content of the Automated test reference field of the Automation panel of a test case must have the following format :
[1] / [2]
With :
-
[1]: Name of the project on the source code repository. -
[2]: Path and name of the Cypress test file, from the root of the project (with the.spec.jsextension).
2. Nature of the exploitable Squash TM parameters
The exploitable Squash TM parameters in a Cypress script will differ depending on whether you're using the Community or Premium version of Squash DEVOPS.
Here is a table showing the exploitable parameters :
| Nature | Key | Community | Premium |
|---|---|---|---|
| Name of the dataset | DSNAME | |
|
| Dataset parameter | DS_[name] | |
|
| Test case reference | TC_REF | |
|
| Test case CUF | TC_CUF_[code] | |
|
| Iteration CUF | IT_CUF_[code] | |
|
| Campaign CUF | CPG_CUF_[code] | |
|
| Test suite CUF | TS_CUF_[code] | |
|
Legend :
CUF: Custom Field[code]: Value of a CUF's "Code" field[name]: Parameter name as filled in Squash TM
3. Squash TM parameters usage
When executing a Squash TM automated test case with Cypress, it is possible to exploit the Squash TM parameters inside the test.
In order to achieve this, you'll have to follow these steps :
-
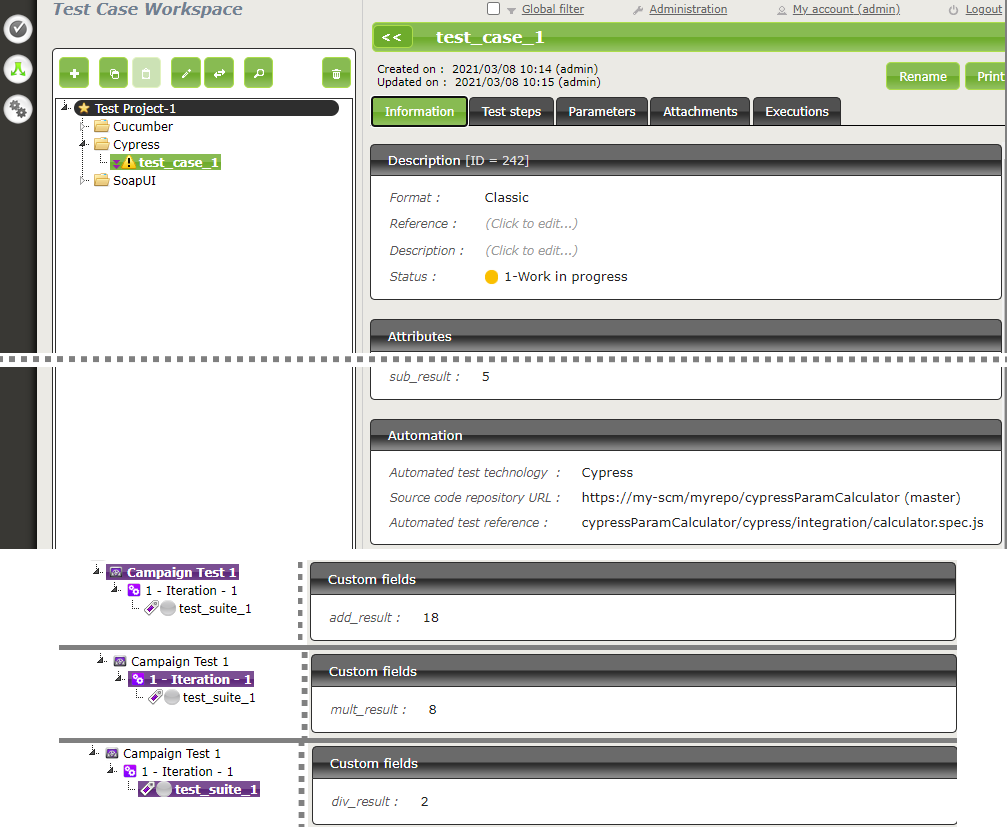
Create custom fields in Squash TM and bind them to the project bearing the test plan to execute.
-
Make sure that the code fields of the parameters correspond to the names of the existing environment variables present in the Cypress script.
Info
Squash TM adds a prefix to the code of the transmitted custom field. Make sure to take it into account.
Please refer to the Squash TM documentation for more information.
Below is an example of a Cypress test file and the corresponding Squash TM test case automation :

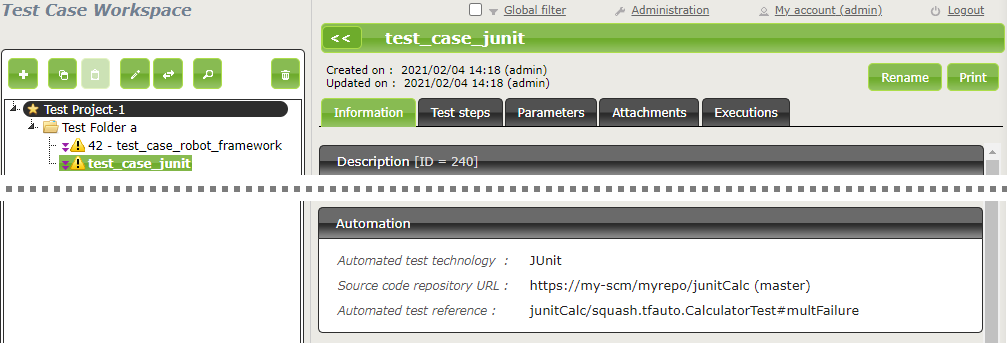
Automation with JUnit
Test reference
In order to bind a Squash TM test case to a JUnit automated test, the content of the Automated test reference field of the Automation panel of a test case must have the following format :
[1] / [2] # [3]
With :
-
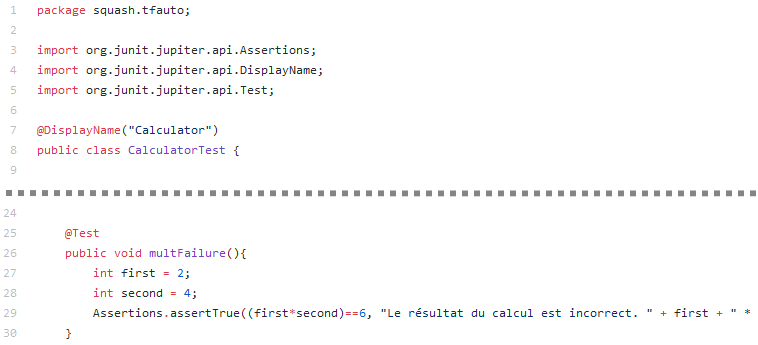
[1]: Name of the project on the source code repository. -
[2]: Qualified name of the test class. -
[3]: Name of the method to test in the test class.
Below is an example of a test class and the corresponding Squash TM test case automation :
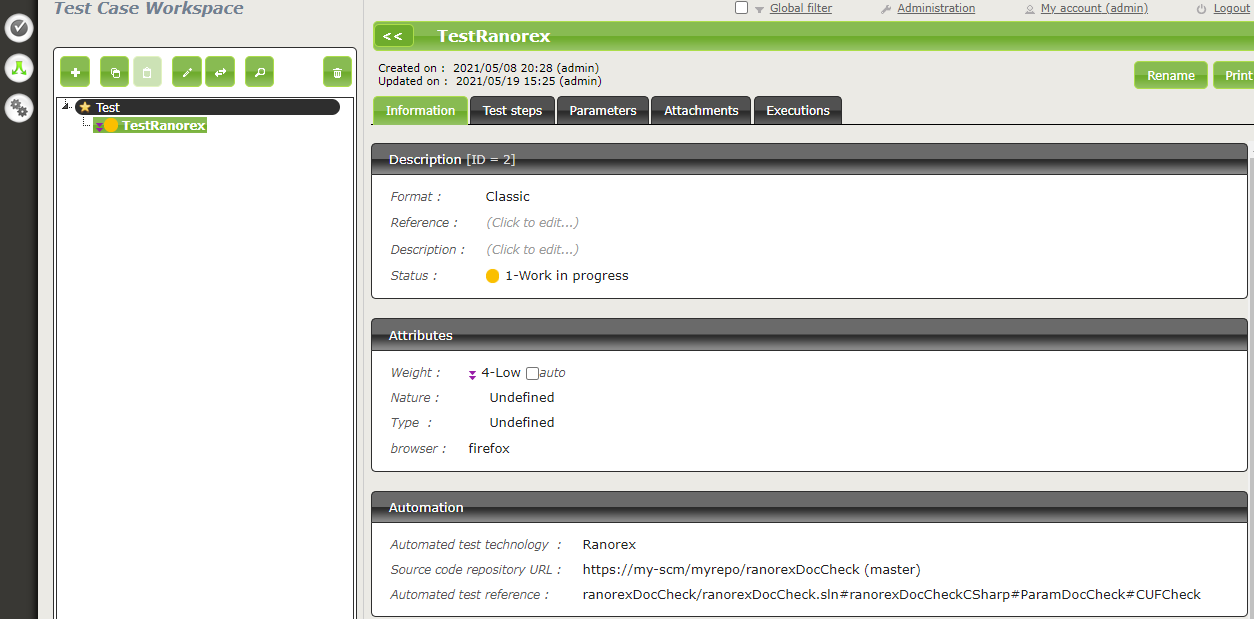
Automation with Ranorex
This feature is available only in the Premium version of Squash AUTOM.
In order to use this feature, an OpenTestFactory agent for Ranorex execution environment is needed. Furthermore, an environment variable called SQUASH_MSBUILD_PATH containing the path to the parent folder of MSBuild.exe must be created. You can execute the following command to get the path to your MSBuild executable :
reg.exe query "HKLM\SOFTWARE\Microsoft\MSBuild\ToolsVersions\4.0" /v MSBuildToolsPath
1. Test reference
In order to bind a Squash TM test case to a Ranorex automated test, the content of the Automated test reference field of the Automation panel of a test case must have the following format :
[1] # [2] # [3] # [4]
With :
-
[1]: The path to the solution's.slnfile from the root of the project source repository. -
[2]: Ranorex project name to execute. -
[3]: Ranorex test suite name to execute. -
[4]: Ranorex test case name to execute. This parameter is optional.
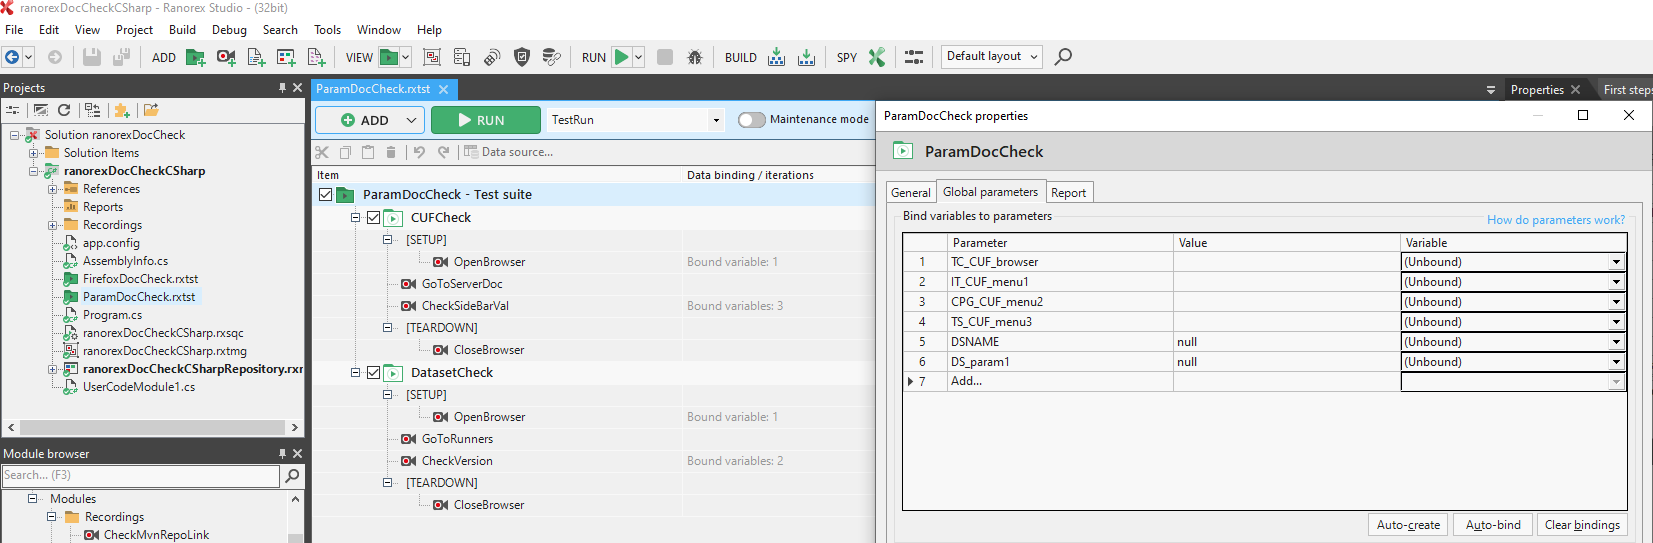
2. Nature of the exploitable Squash TM parameters
Here is a table showing the exploitable parameters :
| Nature | Key |
|---|---|
| Name of the dataset | DSNAME |
| Dataset parameter | DS_[name] |
| Test case reference | TC_REF |
| Test case CUF | TC_CUF_[code] |
| Iteration CUF | IT_CUF_[code] |
| Campaign CUF | CPG_CUF_[code] |
| Test suite CUF | TS_CUF_[code] |
Legend :
CUF: Custom Field[code]: Value of a CUF's "Code" field[name]: Parameter name as filled in Squash TM
3. Squash TM parameters usage
When executing a Squash TM automated test case with Ranorex, it is possible to exploit the Squash TM parameters inside the test.
In order to achieve this, you'll have to follow these steps :
-
Create custom fields in Squash TM and bind them to the project bearing the test plan to execute.
-
Make sure that the code fields of the parameters correspond to the names of the existing parameters present in the Ranorex solution.
Info
Squash TM adds a prefix to the code of the transmitted custom field. Make sure to take it into account. Please refer to the Squash TM documentation for more information.
Below is an example of a Ranorex solution and the corresponding Squash TM test case automation :
Automation with Robot Framework
1. Test reference
In order to bind a Squash TM test case to a Robot Framework automated test, the content of the Automated test reference field of the Automation panel of a test case must have the following format :
[1] / [2] # [3]
With :
[1]: Name of the project on the source code repository.[2]: Path and name of the Robot Framework test, from the root of the project (with the.robotextension).[3]: Name of the test case to execute in the.robotfile.
2. Nature of the exploitable Squash TM parameters
The exploitable Squash TM parameters in a Robot Framework script will differ depending on whether you're using the Community or Premium version of Squash DEVOPS.
Here is a table showing the exploitable parameters :
| Nature | Key | Community | Premium |
|---|---|---|---|
| Name of the dataset | DSNAME | |
|
| Dataset parameter | DS_[name] | |
|
| Test case reference | TC_REF | |
|
| Test case CUF | TC_CUF_[code] | |
|
| Iteration CUF | IT_CUF_[code] | |
|
| Campaign CUF | CPG_CUF_[code] | |
|
| Test suite CUF | TS_CUF_[code] | |
|
Legend :
CUF: Custom Field[code]: Value of a CUF's "Code" field[name]: Parameter name as filled in Squash TM
3. Squash TM parameters usage
When executing a Squash TM automated test case with Robot Framework, it is possible to exploit the Squash TM parameters inside the test.
In order to achieve this, you'll have to follow these steps :
-
Create custom fields in Squash TM and bind them to the project bearing the test plan to execute.
-
Install the squash-tf-services python library on the environment where the Robot Framework execution takes place. It is accessible through the
pippackage management and can be installed by executing the following command line :
python -m pip install squash-tf-services
- Import the library inside the
.robotfile in the Settings section :
Library squash_tf.TFParamService
- You can then retrieve the value of a Squash TM parameter by calling the following keyword :
Get Param <parameter key>
Below is an example of a Robot Framework test file and the corresponding Squash TM test case automation :


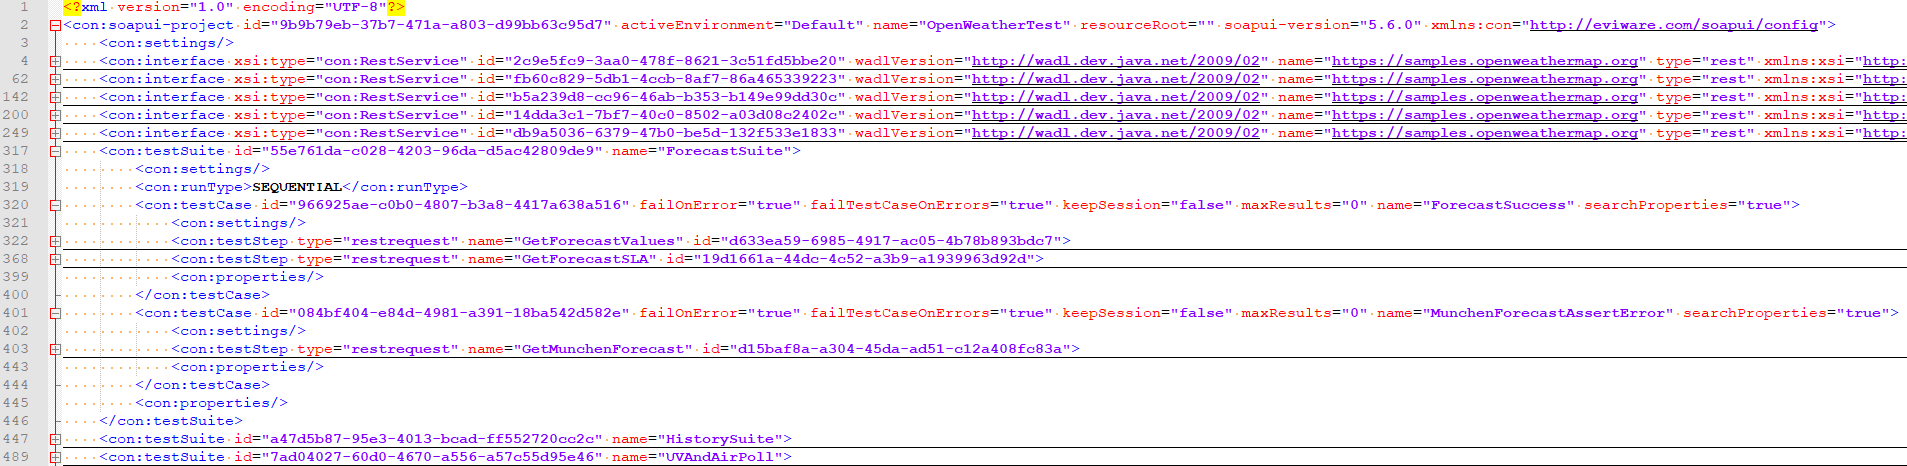
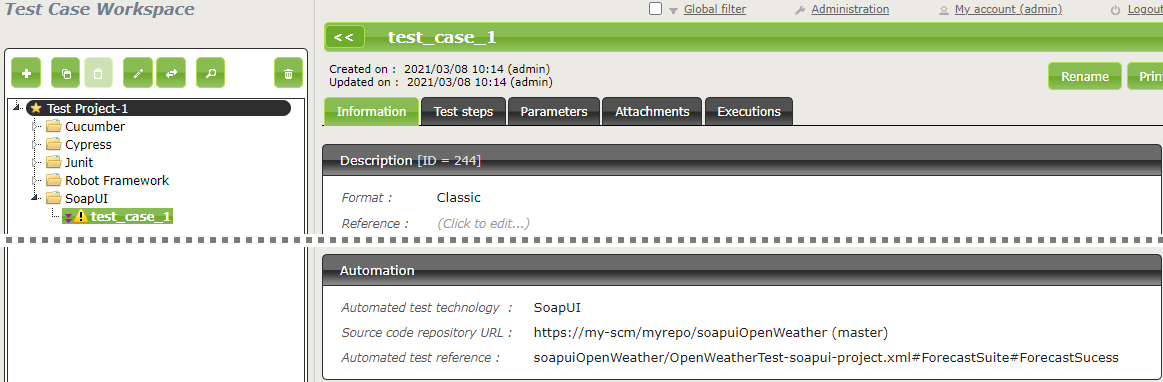
Automation with SoapUI
Test reference
In order to bind a Squash TM test case to a SoapUI automated test, the content of the Automated test reference field of the Automation panel of a test case must have the following format :
[1] / [2] # [3] # [4]
With :
-
[1]: Name of the project on the source code repository. -
[2]: Path and name of the SoapUI test file, from the root of the project (with the.xmlextension). -
[3]: Name of the TestSuite containing the test case. -
[4]: Name of the test case to execute.
Below is an example of a SoapUI test file and the corresponding Squash TM test case automation :
Test plan execution from Squash TM
Squash Orchestrator server declaration
In order to manually launch an execution plan from Squash TM, the Squash Orchestrator server that will execute the automated tests in the suitable environments has to be declared.
It is done in the Automation servers space of the Administration :

-
Name: The name of server, as it will appear in the Test Case workspace. -
Type: Select squashAutom in the dropdown list. -
Url: The address of the Squash Orchestrator Receptionist.
Attention
The Squash Orchestrator event bus service must be accessible by the same url as the Receptionnist, on port 38368.
Once the server is created, you can set an authentication token.
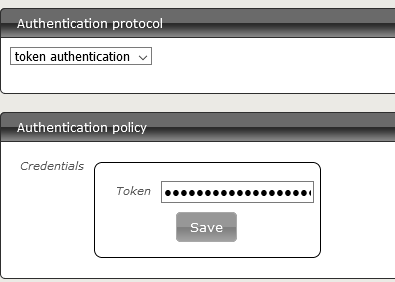
Focus
A token is mandatory for the execution of automated tests from Squash TM. If the automation server does not require authentication token, you still have to set some value in Squash TM.
Squash TM project configuration
Once an automation server has been declared, it needs to be link to a Squash TM Project in order to be used for project's automated tests execution.
In order to do that, follow these steps:
-
Click on
[Administration]then click on[Projects] -
Select an existing project, scroll down to
Test automation management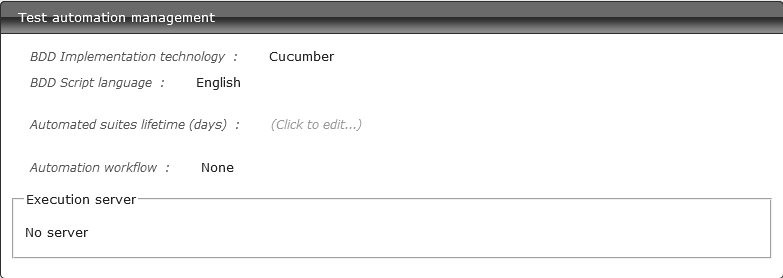
-
Click on
No server. You'll see the list of available servers.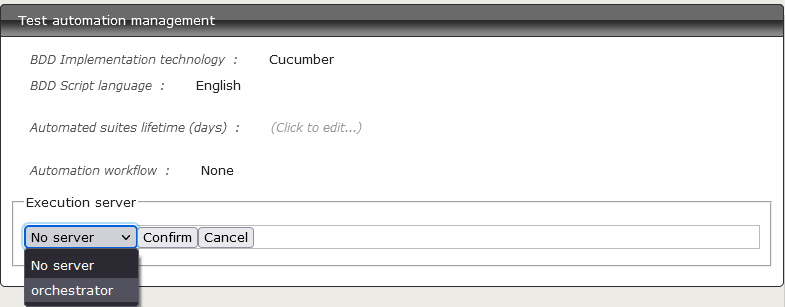
-
Choose the server and
[Confirm]
Automated suite execution
Steps to run an automated test plan in Squash TM are the usual ones:
-
Get to the execution plan of the selected Iteration or Test Suite.
-
Run the test using one of the button on the screen below :
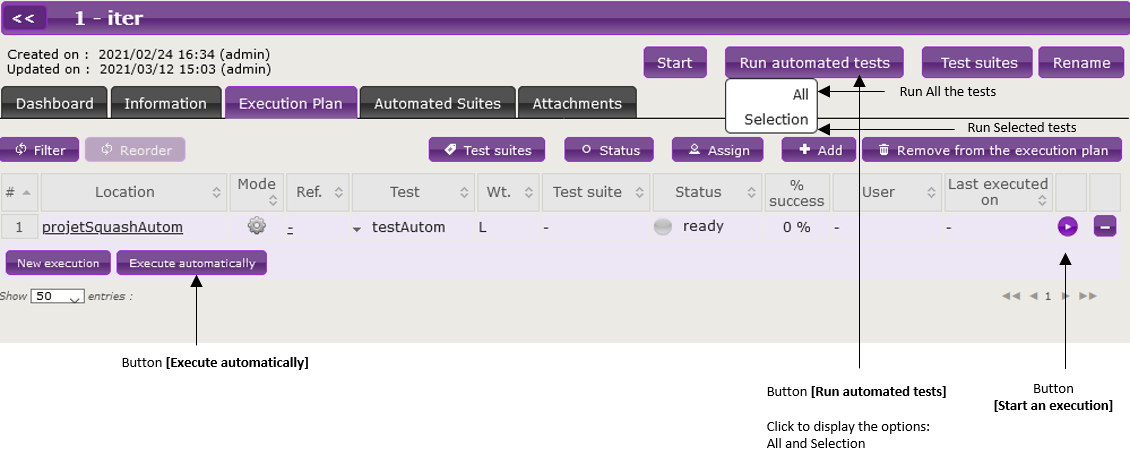
- An Overview of automated test executions popup shows up.
Info
The execution overview popup contains a new section displaying the ongoing executions performed by the Squash Orchestrator. However, the state of the executions are not updated once launched in the current version.
Published results after a Squash TM test plan execution
Independently from the means used to trigger a test plan execution (from Squash TM or a Jenkins pipeline), the kind of results published in Squash TM at the end of the execution of a test plan will differ depending on your using a Squash AUTOM Community or Squash AUTOM Premium licence.
Squash AUTOM Community
After the execution of a Squash TM test plan (iteration or test suite), the following information is updated :
-
ITPIs status update.
-
Automated suite status update.
-
The Allure type report containing all the results from the executed tests.
-
The various ITPIs execution reports are accessible from the Automated Suites tab of the iteration or test suite :
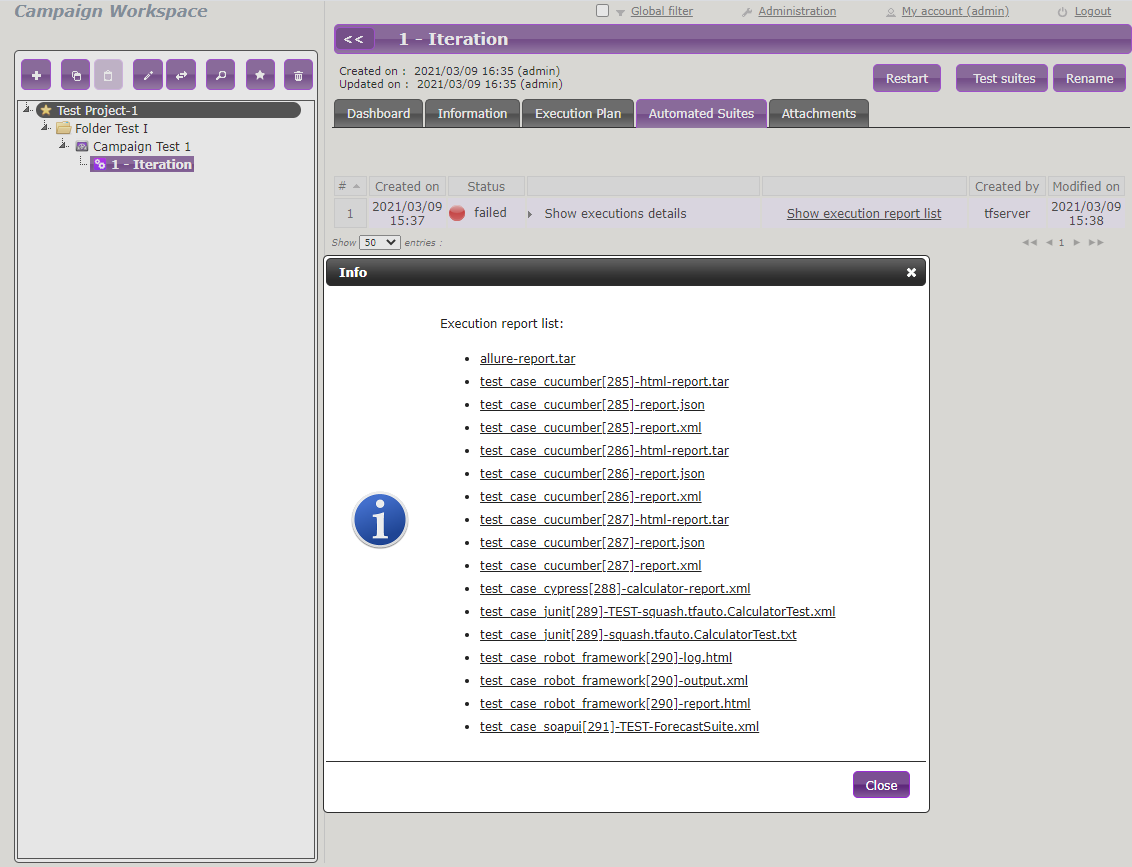
Info
All the results from the automated suite are compiled in an Allure type report, available in the list of reports as a .tar archive.
For more information on the means to exploit and customize the Allure report, please refer to the Allure documentation.
This, however, doesn't happen :
- Creation of a new execution for each executed ITPI.
Squash AUTOM Premium
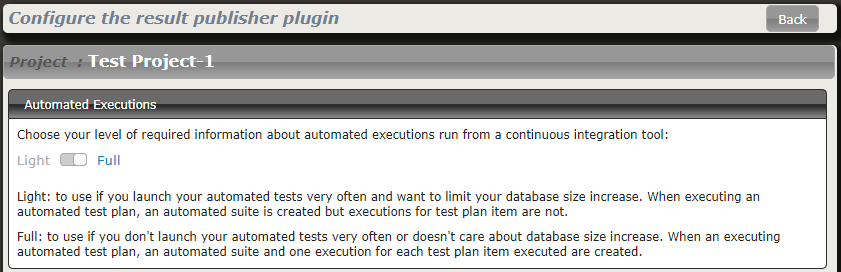
If you are using the Squash AUTOM Premium components, you have access to two types of results publication :
- Light (default value).
- Full.
The choice of publication type is operated on a project basis by accessing the configuration of the Squash TM Result Publisher plugin from the Plugins tab of your project page, inside the Administration Tab :
Light results publication
By choosing the "Light" results publication, the following information is updated after the execution of a Squash TM test plan (iteration or test suite) :
-
ITPIs status update.
-
Automated suite status update.
-
The Allure type report containing all the results from the executed tests.
-
The various ITPIs execution reports are accessible from the Automated Suites tab of the iteration or test suite :
Info
All the results from the automated suite are compiled in an Allure type report, available in the list of reports as a .tar archive.
For more information on the means to exploit and customize the Allure report, please refer to the Allure documentation.
This, however, doesn't happen :
- Creation of a new execution for each executed ITPI.
Full results publication
By choosing the "Full" results publication, the following information is updated after the execution of a Squash TM test plan (iteration or test suite) :
-
ITPIs status update.
-
Creation of a new execution for each executed ITPI.
-
Automated suite status update.
-
The Allure type report containing all the results from the executed tests.
-
The execution reports of the various executions can be accessed from the Automated Suites tab of the iteration or test suite, or from the execution page (the reports are present in the attached files) :

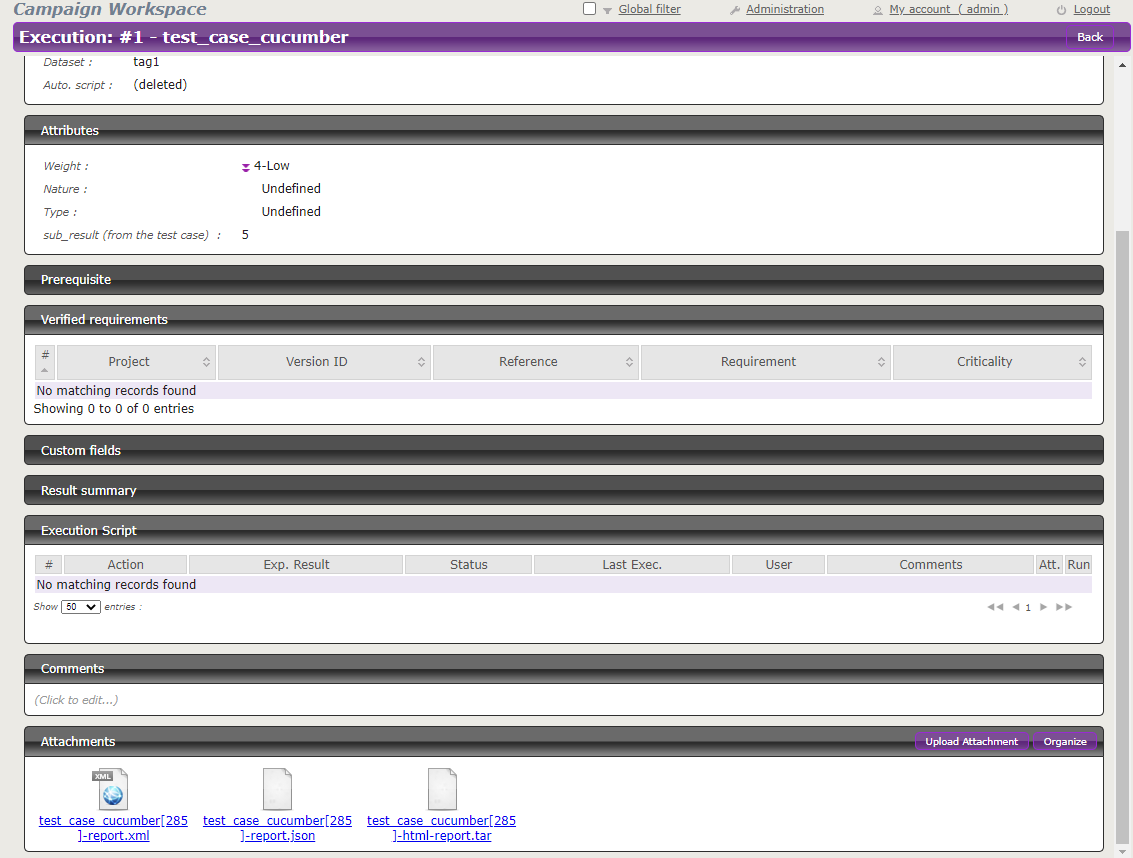
Info
All the results from the automated suite are compiled in an Allure type report, available in the list of reports as a .tar archive.
For more information on the means to exploit and customize the Allure report, please refer to the Allure documentation.