FAQ: Some technical details
How to extract files from a tar file (a.k.a. untar a tar file)?
Some reports (for example the Allure reports) are stored in a tar file.
There are several ways to extract the files from such a tar file.
Using 7-Zip
Download and install the 7-Zip software.
Launch the 7-Zip program.
In its file browser, navigate to the directory that contains the tar file.
Select the tar file in the file browser.
Click the "Extract" button at the top of the screen to untar the file.
Using WinZip
Download and install the WinZip software.
Launch the WinZip program.
Navigate to the tar file in the file browser in the main window.
Click on the "Unzip" button at the top of the page to untar the file.
Using the tar command
If you are on Linux or MacOS or, on Windows, if you have MinGW/MSYS, Cygwin or WSL2 installed, you can use the tar command: tar xvf <tar file>.
How to display an Allure report?
Install Allure
The Allure documentation describes how to install it.
Display an Allure report
Download the tar file from Squash by clicking on its name.
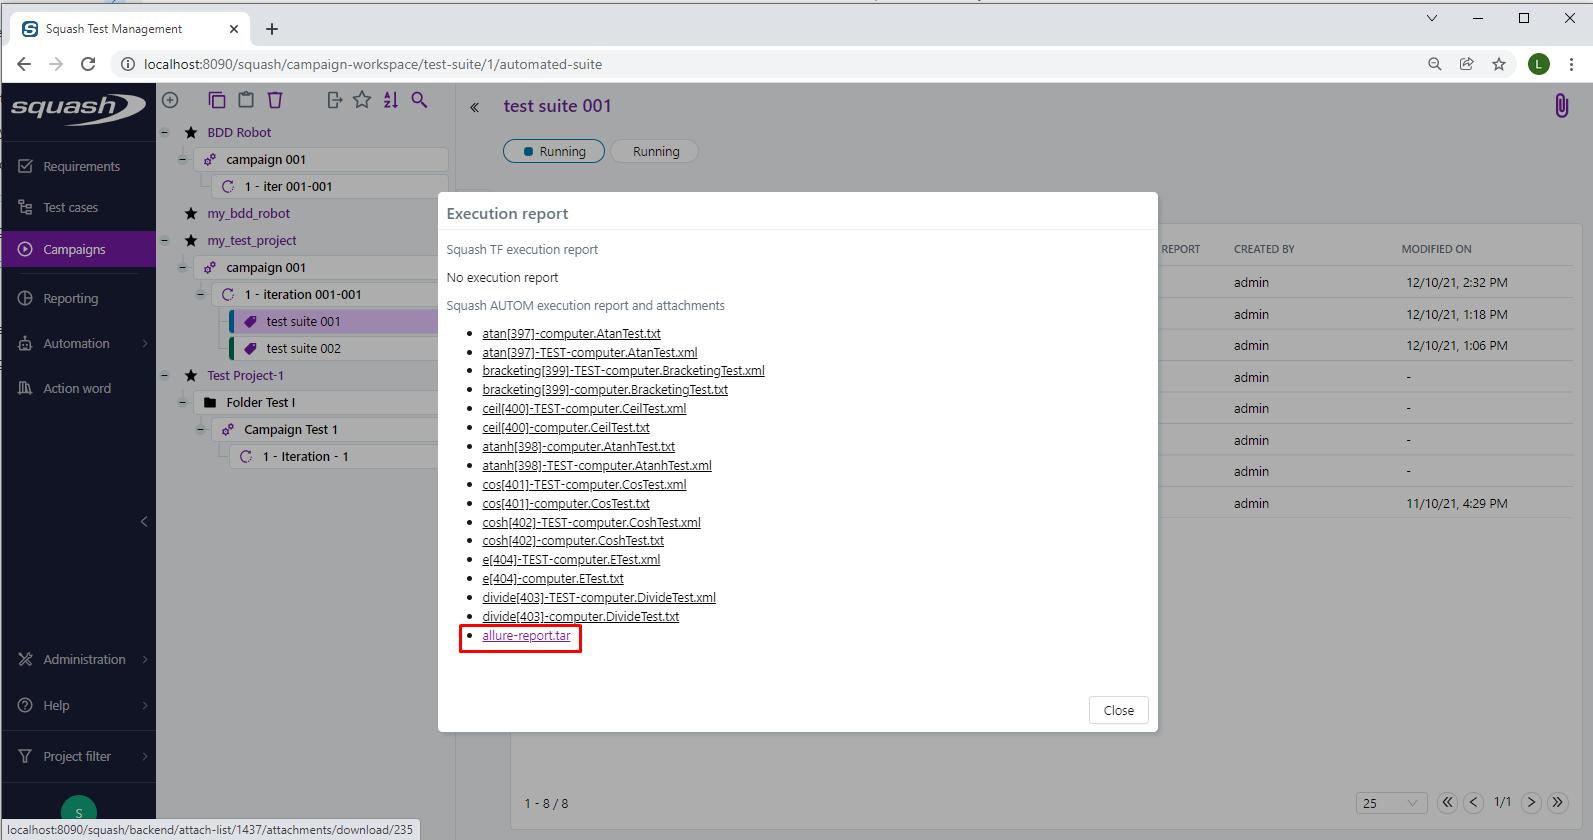 Untar the tar file, this will create an
 allure-report directory.
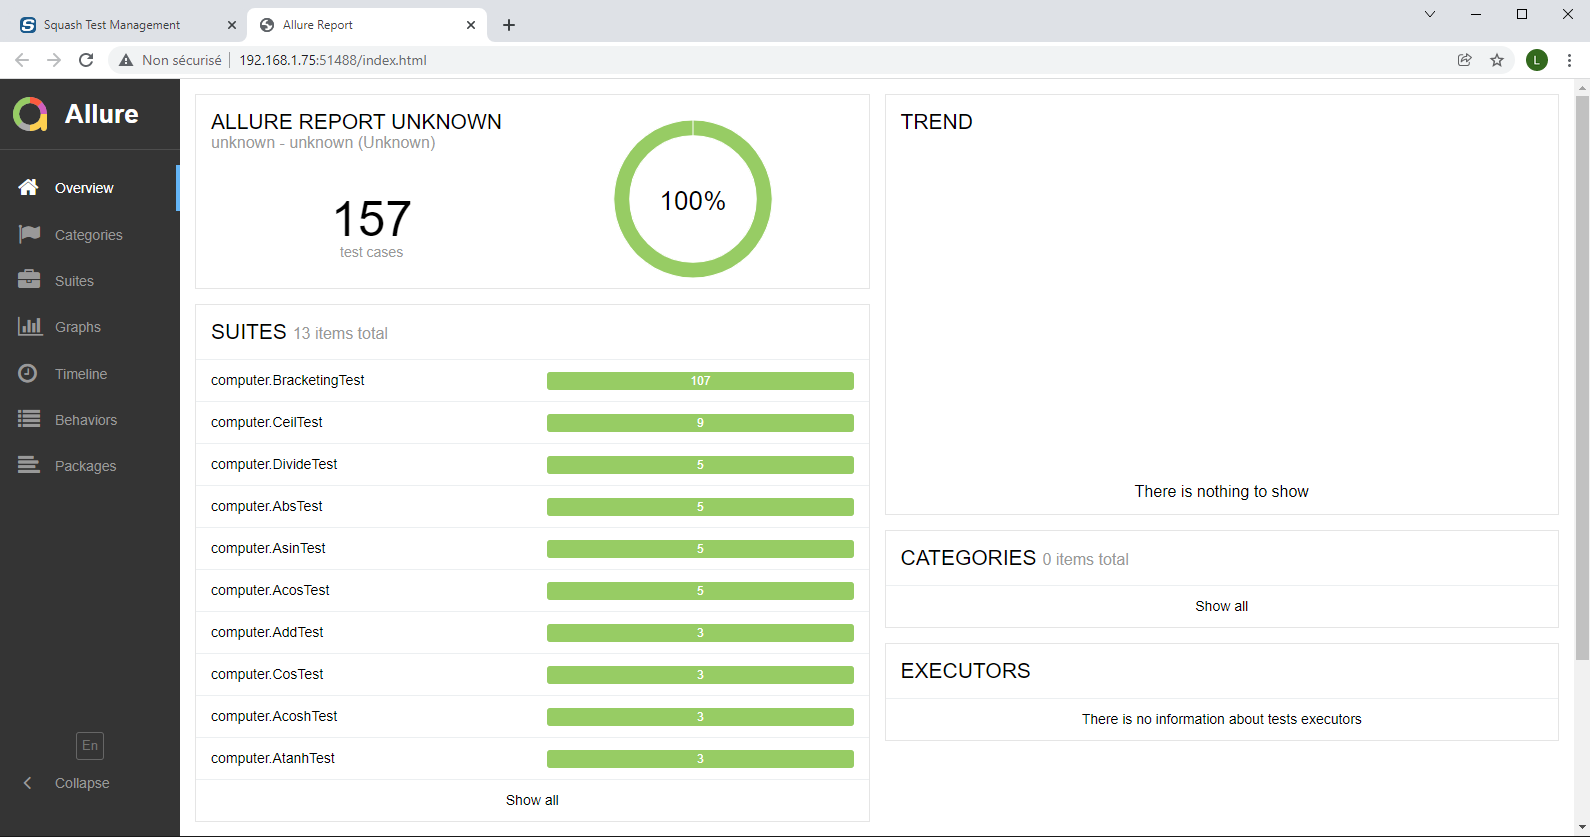
Open a command window and navigate to the directory containing the allure-report directory.
Execute the command allure open.
 Your browser will be open, displaying the Allure report.
How to set up a hook?
Hooks define actions launched at the start and/or end of each test run. They may be used, among other things, to transfer test artefacts to Squash.
A hook definition has the following structure:
- name:
  events:
  if:
  before:
  after:
name and events parts are mandatory, as well as one of before or after parts.
There are two possible ways to set up a hook:
-
Define the hook in provider plugin configuration file
hookssection. This file is typically situated at/app/conf/provider_name.yaml(for example,/app/conf/junit.yaml):apiVersion: opentestfactory.org/v1beta1 kind: ProviderConfig current-context: ... contexts: ... hooks: - name: my hook events: - categoryPrefix: junit category: junit before: - run: echo hello after: - run: echo goodbye -
Use a separate definition file and set
{provider_name}_PROVIDER_HOOKSenvironment variable to its path:JUNIT_PROVIDER_HOOKS=/app/hooks/junit_hooks.yamlIn this case, the file must contain only
hookssection:hooks: - name: my hook events: - categoryPrefix: junit category: junit before: - run: echo hello after: - run: echo goodbye
If {provider_name}_PROVIDER_HOOKS environment variable is set, the hooks defined in provider plugin
configuration file are ignored.
How to transfer test artefacts to Squash ?
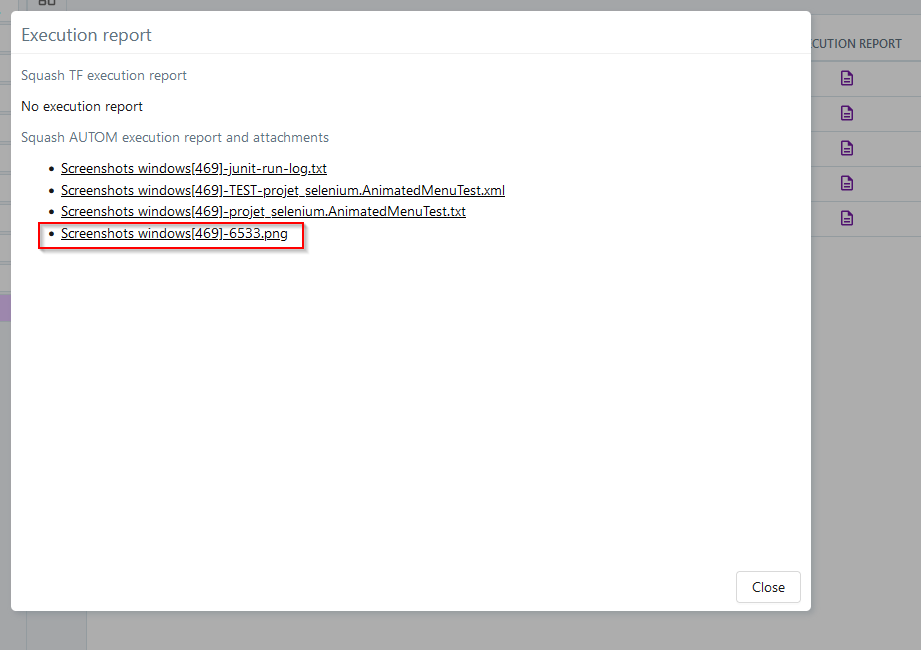
It is possible to transfer test artefacts available at the end of execution, for example screenshots,
to Squash. These files may be accessed from the Execution report list.
To do this, one has to set up a hook.
Let's take, as an example, an execution of a JUnit/Selenium test suite in Windows environment.
It uses a Git repository seleniumtests. A screenshot is taken at the end of each test and
saved in the project target/screenShots folder.
To apply the hook to Squash piloted test runs, we have first to define events to which it is linked.
Squash uses JUnit provider plugin execute action:
hooks:
    - name: Attach screenshots to JUnit execution results
      events:
      - categoryPrefix: junit
        category: execute
Next, we have to define actions that will be launched at the end of each test execution:
hooks:
    - name: Attach screenshots to JUnit execution results
    events:
    - categoryPrefix: junit
      category: execute
    after:
    - uses: actions/get-files
      with:
        pattern: '*.png'
        warn-if-not-found: No screenshots found after execution.
      working-directory: seleniumtests/target/screenShots
The hook uses actions/get-files action to retrieve all .png files from seleniumtests/target/screenShots
folder and attach them to the test execution results. If there are no .png file in this folder,
a warning will be issued and the next test will be executed.
Attention
If screenshots folder is defined inside the Git project, working-directory path must contain the project name.
This hook is good enough for transferring screenshots. However, if we do not want to attach
previously executed tests screenshots to each test, we have to cleanup the screenShots folder
before each execution:
hooks:
    - name: Attach screenshots to JUnit execution results
    events:
    - categoryPrefix: junit
      category: execute
    before:
    - uses: actions/delete-file
      with:
        path: '*.png'
      working-directory: seleniumtests/target/screenShots
      continue-on-error: true
    after:
    - uses: actions/get-files
      with:
        pattern: '*.png'
        warn-if-not-found: No screenshots found after execution.
      working-directory: seleniumtests/target/screenShots
The hook uses actions/delete-file action to delete all .png files from
seleniumtests/target/screenShots directory before running a new test.
continue-on-error is added to not interrupt the execution if the folder
is not found.
Of course, it is possible to modify this example depending on project and use it for transferring to Squash files other than screenshots.
You can also use the if keyword to restrict hook scope. For further details,
refer to the OpenTestFactory documentation, namely Hooks and
Hooks for provider plugins chapters.
How to use Maven Daemon for the test execution?
What is Maven Daemon?
Maven Daemon is a Maven wrapper that builds the modules in parallel using multiple CPU cores. It is a native executable, consuming less memory, starting up faster and, as a daemon, requiring only a single launch. It thus allows for faster builds and also for more efficient test execution.
For the JUnit or Cucumber tests that only last a few seconds, the total execution time can be reduced by 10% to 20%. The longer the tests, the lower the gain.
To use Maven Daemon instead of Maven, you have first to install it in the execution environment.
Install
All Maven Daemon installation options are described in detail in the project readme.
To install it manually, just download the latest .zip archive from
apache.org
and extract it to a directory of your choice, then add the bin directory
to the PATH. You can use the mvnd --version command to check that
Maven Daemon is properly installed.
However, the JUnit and Cucumber providers of the orchestrator use
the mvn test command to execute tests. If we want the executions to
be launched by Maven Daemon, we need to alias the mvn command so that it
points to the mvnd executable.
Pointing mvn to mvnd
The procedure will depend on the test execution environment operating system. It is assumed that Java and Maven Daemon are already installed in this environment.
Windows
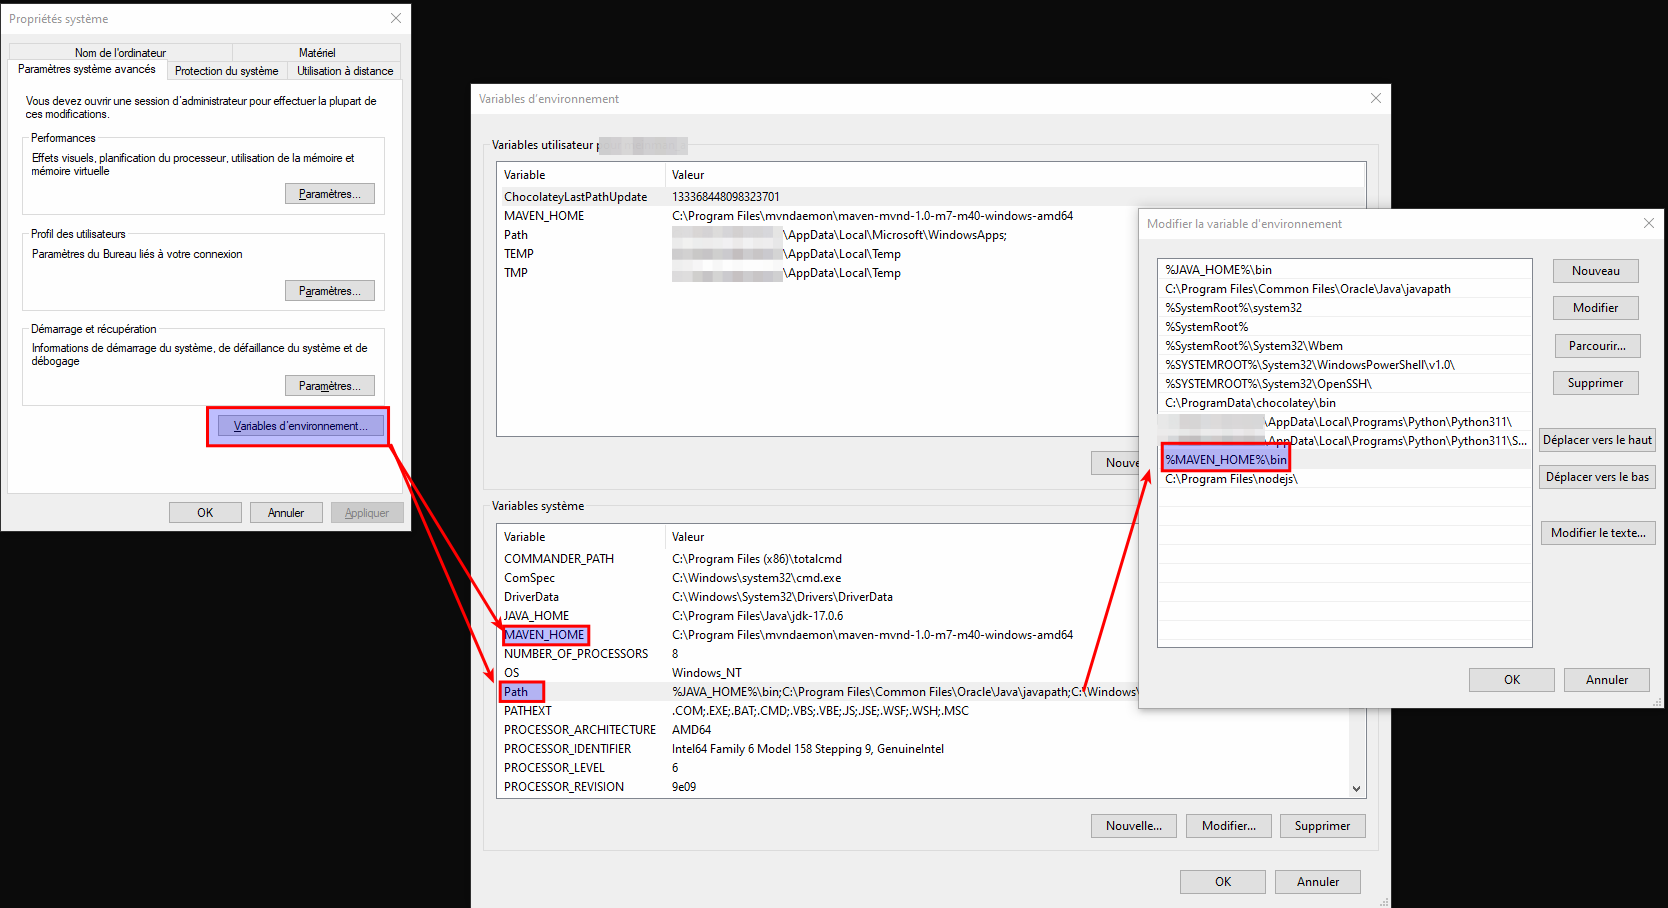
- Rename the
mvnd.exeexecutable (in the Maven Daemon installation directorybin) tomvn.exe. - Modify the system environment variables:
MAVEN_HOMEmust contain the Maven Daemon installation directory path (withoutbin);- the
PATHvariable must contain the relative path of the Maven Daemonbin:%MAVEN_HOME%\bin.
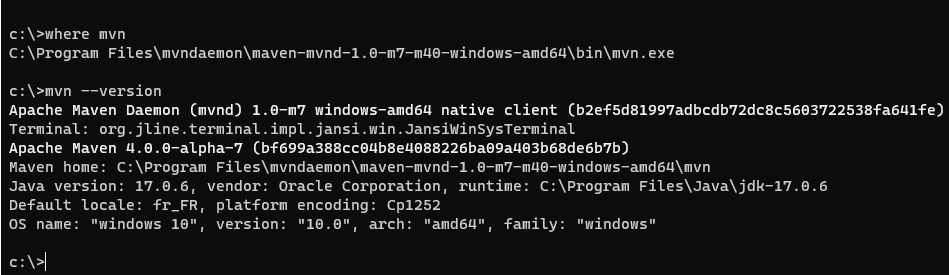
To check if the substitution was successful, you can use the where mvn command or
the mvn --version command. The first must display the renamed mvnd executable
path and the latter must display the current Maven Daemon installation information.
Reminder
After modifying the environment variables and verifying the modification, you need to relaunch the orchestrator's agent in a new command prompt window.
Linux
- Create the file named
mvnin the/usr/local/bindirectory. Add the following line to this file:/home/user/mvnd_install_path/bin/mvnd "$@". Make the file executable. - Run
echo $PATHand verify that the/usr/local/binpath is located before themvnpath. Otherwise, add the following line to the/home/user/.bashrc:export PATH="/usr/local/bin:$PATH" - Restart your session.
To check that the changes are correct, run the which mvn command. It must display
/usr/local/bin/mvn. As for the mvn --version command, it must display the Maven Daemon
installation information.
Tip
Instead of replacing Maven path, you can replace its executable.
In this case, you need to go to the Maven bin folder and replace the original
mvn executable by the mvn file containing the line /home/user/mvnd_install_path/bin/mvnd "$@".
(The safest way to proceed is to rename the original mvn to mvn.old.)
How to stop the daemon at the end of a workflow ?
On Windows, if a workflow is executed using Maven Daemon, the daemon is launched inside the workspace. Therefore, the workspace folder cannot be deleted at the end of the execution. If you want to keep the orchestrator agent folder clean, you can use a workflow-level hook (job hook).
Info
Job hooks implementation is described in the OpenTestFactory documentation.
The first solution is to use a setup hook to launch the daemon before
the workspace creation. In this case, the daemon will be launched inside the agent
folder and the workspace folder can be deleted at the end of the execution.
hooks:
  - name: Launch Maven Daemon
    events:
    - channel: setup
    before:
    - run: mvn --version
The mvn --version command launches a daemon before displaying the version
information.
You can also stop the daemon before the workspace deletion so that the daemon frees the workspace folder:
hooks:
  - name: Stop Maven Daemon
    events:
    - channel: teardown
    before:
    - run: mvn --stop
Attention
The mvn --stop command kills all daemons regardless of their status.