Installation guide
Security
Due to some security issues, it is strongly advised to use Squash TM 2.2.0 (or higher 2.X.Y) or any version greater or equal to 3.0.0.
This page describes how to install one by one all the components of Squash AUTOM.
Legend
† indicates a component which is common to Squash AUTOM and Squash DEVOPS.
️‡ indicates a Premium component. An overview of the Premium features is available here. To benefit of these or to ask for more information, check our website or contact us.
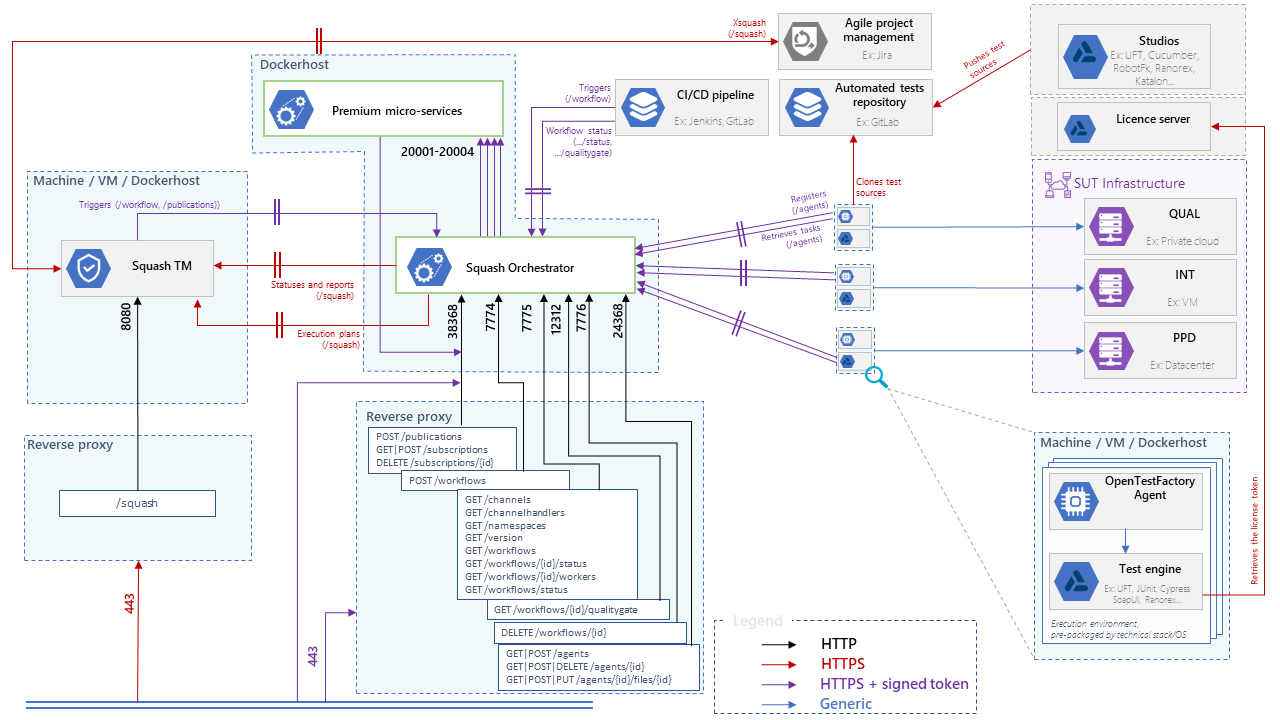
Diagrams
Overview of Squash AUTOM and Squash DEVOPS components
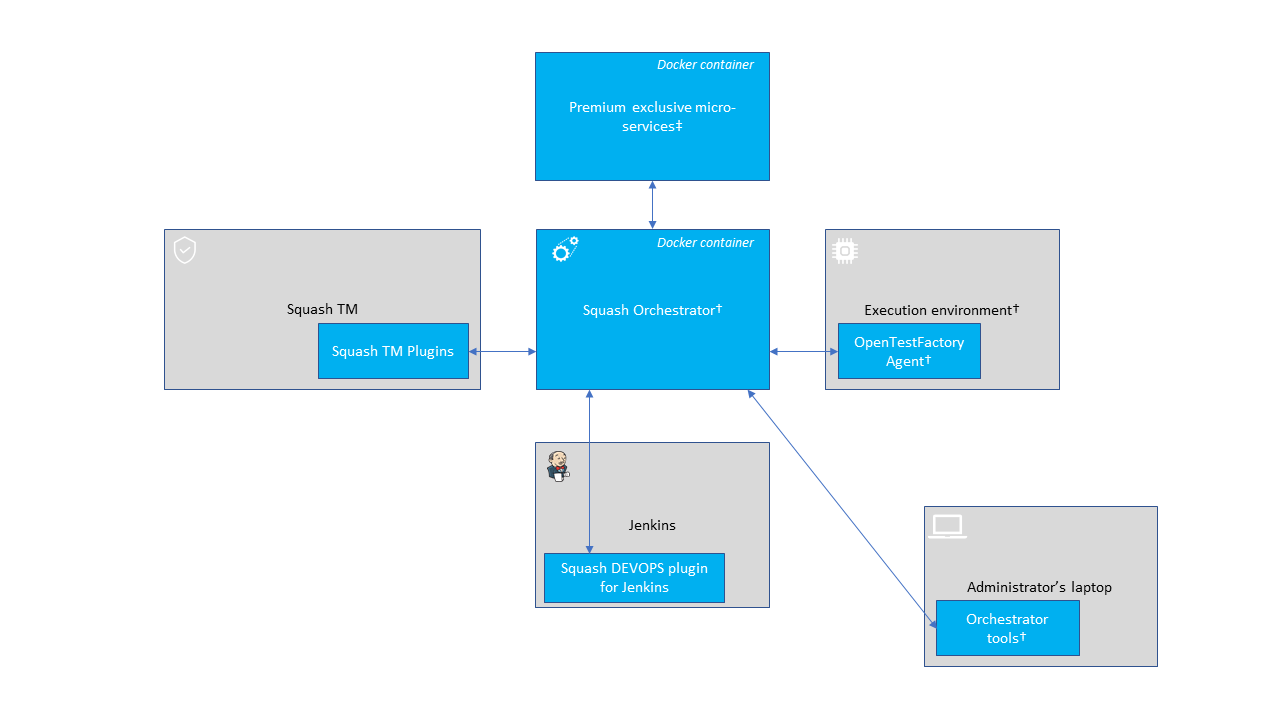
Interconnections
Squash Orchestrator†

Installation
The installation of the orchestrator consists in deploying a Docker image. It contains all core services (part of the OpenTestFactory Orchestrator) and some Squash specific services.
To get the latest image of Squash Orchestrator, use the following command:
docker pull squashtest/squash-orchestrator:4.3.0
Recommendations for sizing the Docker container are:
- CPU: 2
- RAM: 2 GB
- disk: provide the capacity for storing the execution reports and their attachments for one hour of usage
Trouble shooting - Accessibility of the Squash TM instance
Check that the Squash TM instance is accessible from Squash Orchestrator. To do this, go onto the Docker host and run the command (replacing https://squashtm.example.com/squash with the URL of your instance):
curl https://squashtm.example.com/squash/isSquashAlive
Squash is Alive!
Usage
Configuring the image
The execution of the following command will start the Squash Orchestrator using an existing execution environment, with self-generated trusted keys (which is not recommended in a production setup):
docker run -d \
         --name orchestrator \
         -p 7774:7774 \
         -p 7775:7775 \
         -p 7776:7776 \
         -p 38368:38368 \
         -p 24368:24368 \
         -p 12312:12312 \
         -e SSH_CHANNEL_HOST=the_environment_ip_or_hostname \
         -e SSH_CHANNEL_USER=user \
         -e SSH_CHANNEL_PASSWORD=secret \
         -e SSH_CHANNEL_TAGS=ssh,linux,robotframework \
         squashtest/squash-orchestrator:4.3.0
docker run -d ^
         --name orchestrator ^
         -p 7774:7774 ^
         -p 7775:7775 ^
         -p 7776:7776 ^
         -p 38368:38368 ^
         -p 24368:24368 ^
         -p 12312:12312 ^
         -e SSH_CHANNEL_HOST=the_environment_ip_or_hostname ^
         -e SSH_CHANNEL_USER=user ^
         -e SSH_CHANNEL_PASSWORD=secret ^
         -e SSH_CHANNEL_TAGS=ssh,linux,robotframework ^
         squashtest/squash-orchestrator:4.3.0
docker run -d `
         --name orchestrator `
         -p 7774:7774 `
         -p 7775:7775 `
         -p 7776:7776 `
         -p 38368:38368 `
         -p 24368:24368 `
         -p 12312:12312 `
         -e SSH_CHANNEL_HOST=the_environment_ip_or_hostname `
         -e SSH_CHANNEL_USER=user `
         -e SSH_CHANNEL_PASSWORD=secret `
         -e SSH_CHANNEL_TAGS=ssh,linux,robotframework `
         squashtest/squash-orchestrator:4.3.0
It exposes the following services on the corresponding ports:
- receptionist (port 7774)
- observer (port 7775)
- killswitch (port 7776)
- eventbus (port 38368)
- agentchannel (port 24368)
- quality gate (port 12312)
If you do not plan to declare agents, port 24368 may not be exposed. Similarly, if you don't plan to use the quality gate, port 12312 may not be exposed.
Configuration with pre-generated keys
Outside of experimentation, it is recommended to start Squash Orchestrator by specifying one or more public keys that will be used to validate tokens authenticating incoming requests.
The following commands generate a pair of trusted_key.pem / trusted_key.pub keys (you can generate several if you wish):
openssl genrsa -out trusted_key.pem 4096
openssl rsa -pubout -in trusted_key.pem -out trusted_key.pub
If your public keys (*.pub) are in a public_keys directory, here is an example making them accessible to the orchestrator (all files in this directory will be accessible to the orchestrator, do not put your private keys there):
docker run ... \
           -v /path/to/public_keys:/etc/squashtf \
           ...
docker run ... ^
           -v d:\path\to\public_keys:/etc/squashtf ^
           ...
docker run ... `
           -v d:\path\to\public_keys:/etc/squashtf `
           ...
If you plan to use only one public key, you can make it accessible directly:
docker run ... \
           -v /path/to/public_keys/trusted_key.pub:/etc/squashtf/trusted_key.pub \
           ...
docker run ... ^
           -v d:\path\to\public_keys/trusted_key.pub:/etc/squashtf/trusted_key.pub ^
           ...
docker run ... `
           -v d:\path\to\public_keys/trusted_key.pub:/etc/squashtf/trusted_key.pub `
           ...
Tokens verified by these keys will have full access to the default namespace. This behavior can be changed by modifying the image configuration.
For more details about Squash Orchestrator configuration, please check the OpenTestFactory Orchestrator documentation on which Squash Orchestrator is based (the deployment of the two orchestrators is similar). That documentation also details the specific cases of deploying with docker-compose or with Kubernetes.
Using self-signed certificates
A FAQ details how to use Squash Orchestrator with self-signed certificates.
Run the image in Premium mode‡
In the case where
- you are also using Squash DEVOPS,
- you have a Squash DEVOPS Premium license, and
- hence, you deploy the Premium version of the Test Plan Retriever Squash TM plugin,
then, you must run Squash Orchestrator in Premium mode.
In order to do that, you have to add the following parameter in the Squash Orchestrator's run command: -e SQUASH_LICENCE_TYPE=premium.
docker run -d \
         --name orchestrator \
         -p 7774:7774 \
         -p 7775:7775 \
         -p 7776:7776 \
         -p 38368:38368 \
         -p 24368:24368 \
         -p 12312:12312 \
         -e SSH_CHANNEL_HOST=the_environment_ip_or_hostname \
         -e SSH_CHANNEL_USER=user \
         -e SSH_CHANNEL_PASSWORD=secret \
         -e SSH_CHANNEL_TAGS=ssh,linux,robotframework \
         -e SQUASH_LICENCE_TYPE=premium \
         squashtest/squash-orchestrator:4.3.0
docker run -d ^
         --name orchestrator ^
         -p 7774:7774 ^
         -p 7775:7775 ^
         -p 7776:7776 ^
         -p 38368:38368 ^
         -p 24368:24368 ^
         -p 12312:12312 ^
         -e SSH_CHANNEL_HOST=the_environment_ip_or_hostname ^
         -e SSH_CHANNEL_USER=user ^
         -e SSH_CHANNEL_PASSWORD=secret ^
         -e SSH_CHANNEL_TAGS=ssh,linux,robotframework ^
         -e SQUASH_LICENCE_TYPE=premium ^
         squashtest/squash-orchestrator:4.3.0
docker run -d `
         --name orchestrator `
         -p 7774:7774 `
         -p 7775:7775 `
         -p 7776:7776 `
         -p 38368:38368 `
         -p 24368:24368 `
         -p 12312:12312 `
         -e SSH_CHANNEL_HOST=the_environment_ip_or_hostname `
         -e SSH_CHANNEL_USER=user `
         -e SSH_CHANNEL_PASSWORD=secret `
         -e SSH_CHANNEL_TAGS=ssh,linux,robotframework `
         -e SQUASH_LICENCE_TYPE=premium `
         squashtest/squash-orchestrator:4.3.0
Otherwise, if you deploy the Community version of the Test Plan Retriever, you must not run Squash Orchestrator in Premium mode.
Orchestrator tools†
Installation
The orchestrator tools aim at simplifying the use of that one. They can be installed on any machine from where we want to administrate the orchestrator.
They require Python 3.8 or later. They are usable on Linux, maxOS, or Windows.
These tools can be installed from PyPI by using the following command:
pip install --upgrade opentf-tools
Overview of the tool capabilities
-
opentf-readywaits until the orchestrator is ready to accept workflows. -
opentf-donewaits until the orchestrator can be safely stopped (i.e. it has no more pending tasks). -
opentf-ctlcan be used to- start / track / stop a workflow
- generate a signed token
- list the agents
- generate / modify a configuration file
- …
Generating a signed token
Requests to Squash Orchestrator must be associated with signed tokens.
Given a trusted_key.pem private key in the current directory, the following command generates a signed token that will be recognized by the orchestrator if it knows the corresponding public key:
opentf-ctl generate token using trusted_key.pem
Please specify an algorithm (RS512 if unspecified):
The specified algorithm is: RS512
Please enter the issuer (your company or department): acme
Please enter the subject (you or the person you are making this token for): charlie
The signed token is:
ey...
Details
A complete description of the tools is available in the OpenTestFactory documentation.
Services reserved for Squash AUTOM Premium‡

Installation
To install the Docker image of the services reserved for Squash AUTOM Premium, you must get the compressed image from Squash support service. Then, you have to execute the following command:
docker load -i squash-autom-premium-3.10.0.tar.gz
This command will load the docker.squashtest.org/squashtest/squash-autom-premium:3.10.0 image into the local registry.
Recommendations for sizing the Docker container are:
- CPU: 1
- RAM: 2 GB (3 GB recommended)
- disk: provide the capacity for storing the execution reports and their attachments for one hour of usage
Usage
The services reserved for Squash AUTOM Premium complement those of Squash Orchestrator, they do not replace them.
It is strongly recommended to use docker-compose or Kubernetes to deploy reserved services alongside Squash Orchestrator.
The configuration parameters are as follows:
| Parameter | Required? | Description |
|---|---|---|
| BUS_HOST | yes | IP address or DNS name of the EventBus service of the Squash Orchestrator with which the micro-services communicate. |
| BUS_PORT | yes | Port of the EventBus service of the Squash Orchestrator with which the micro-services communicate. |
| BUS_TOKEN | no | JWT token accepted by the EventBus service of the Squash Orchestrator with which the micro-services communicate. |
| EXTERNAL_HOSTNAME | no | IP address or DNS name of the micro-services of the Docker image of the services reserved for Squash AUTOM Premium. |
| Volume /etc/squashtf | yes | Volume to mount toward a set of public keys accepted for validity of JWT tokens. |
| Volume /tmp | yes | Volume to mount toward a folder shared with Squash Orchestrator which will temporarily host files generated during execution. |
With docker-compose
In a new folder, create a data directory in which you will place your public key.
+-- dossier
|    +-- .env
|    +-- data
|         +-- trusted_key.pub
|    +-- docker-compose.yml
Also create an .env file that will centralize the versions of the components you will use:
ORCHESTRATOR_VERSION=4.3.0
PREMIUM_VERSION=3.10.0
TOKEN=ey...
Finally, create the following docker-compose.yml file:
# docker-compose up -d
version: "3.4"
services:

  # Squash Orchestrator
  orchestrator:
    container_name: orchestrator
    image: squashtest/squash-orchestrator:$ORCHESTRATOR_VERSION
    restart: always
    volumes:
    - type: bind
      source: ./data/trusted_key.pub
      target: /etc/squashtf/squash.pub
    - shared-tmp:/tmp
    environment:
    - SQUASH_LICENCE_TYPE=premium
    ports:
    - "7774:7774"
    - "7775:7775"
    - "7776:7776"
    - "38368:38368"
    - "24368:24368"
    - "12312:12312"

  # Squash autom premium container
  squash-autom-premium:
    container_name: squash-autom-premium
    image: docker.squashtest.org/squashtest/squash-autom-premium:$PREMIUM_VERSION
    restart: always
    environment:
      - BUS_HOST=orchestrator
      - BUS_PORT=38368
      - EXTERNAL_HOSTNAME=squash-autom-premium
      - BUS_TOKEN=$TOKEN
    volumes:
      - type: bind
        source: ./data/trusted_key.pub
        target: /etc/squashtf/squash.pub
      - shared-tmp:/tmp
    ports:
     - "10084:10084"
     - "10085:10085"
     - "10087:10087"
     - "20001:20001"
     - "20002:20002"
     - "20003:20003"

volumes:
  shared-tmp:
To launch Squash Orchestrator and the services reserved for Squash AUTOM Premium, go to this folder and use the following command:
docker compose up -d
You can view the logs of this deployment using the following command:
docker compose logs
To stop Squash Orchestrator and the services reserved for Squash AUTOM Premium, go in the folder and use the following command:
docker compose down
With Kubernetes
The following example deploys a pod containing Squash Orchestrator and the services reserved for Squash AUTOM Premium.
---
apiVersion: apps/v1
kind: Deployment
metadata:
  labels:
    app: squash-autom-premium
  name: squash-autom-premium
spec:
  replicas: 1
  selector:
    matchLabels:
      app: squash-autom-premium
  template:
    metadata:
      labels:
        app: squash-autom-premium
    spec:
      containers:
      - name: orchestrator
        image: squashtest/squash-orchestrator:4.3.0
        imagePullPolicy: Always
        env:
        - name: SQUASH_LICENCE_TYPE
          value: premium
        ports:
        - containerPort: 7774
          protocol: TCP
        - containerPort: 7775
          protocol: TCP
        - containerPort: 7776
          protocol: TCP
        - containerPort: 38368
          protocol: TCP
        - containerPort: 24368
          protocol: TCP
        - containerPort: 12312
          protocol: TCP
        resources:
          limits:
            memory: 5G
          requests:
            cpu: "1"
            memory: 5G
        volumeMounts:
        - mountPath: /tmp/
          name: attachment-storage
        - mountPath: /etc/squashtf
          name: squash-orchestrator-trusted-key

      - name: premium
        image: docker.squashtest.org/squashtest/squash-autom-premium:3.10.0
        imagePullPolicy: IfNotPresent
        env:
        - name: BUS_HOST
          value: localhost
        - name: BUS_PORT
          value: "38368"
        resources:
          limits:
            memory: 1G
          requests:
            cpu: 500m
            memory: 1G
        volumeMounts:
        - mountPath: /tmp/
          name: attachment-storage
        - mountPath: /etc/squashtf
          name: squash-orchestrator-trusted-key
      imagePullSecrets:
      - name: docker-registry
      restartPolicy: Always
      securityContext: {}
      volumes:
      - name: attachment-storage
        emptyDir: {}
      - name: squash-orchestrator-trusted-key
        secret:
          defaultMode: 420
          secretName: trusted-keys

---
apiVersion: v1
kind: Service
metadata:
  name: squash-autom-premium
spec:
  selector:
    app: squash-autom-premium
  ports:
  - name: receptionist
    port: 7774
    protocol: TCP
    targetPort: 7774
  - name: eventbus
    port: 38368
    protocol: TCP
    targetPort: 38368
  - name: observer
    port: 7775
    protocol: TCP
    targetPort: 7775
  - name: killswitch
    port: 7776
    protocol: TCP
    targetPort: 7776
  - name: agentchannel
    port: 24368
    protocol: TCP
    targetPort: 24368
  - name: qualitygate
    port: 12312
    protocol: TCP
    targetPort: 12312
To deploy this pod and service on your Kubernetes cluster, create a namespace (or use an existing namespace):
kubectl create namespace my-namespace
Then, create a secret containing your public key, deploy this secret in the namespace you just created:
kubectl create secret generic trusted-keys --from-file=trusted_key.pub=trusted_key.pub --namespace my-namespace
Finally, deploy the pod and the service:
kubectl apply -f squash-autom-premium.yaml --namespace my-namespace
To delete the pod, use the following command:
kubectl delete -f squash-autom-premium.yaml --namespace my-namespace
With Docker
Reminder
It is strongly recommended to use docker-compose or Kubernetes to deploy the services reserved for Squash AUTOM Premium alongside Squash Orchestrator.
The following commands allow you to deploy Squash Orchestrator and the services reserved for Squash AUTOM Premium, with auto-generation of an approved key (which is not recommended in a production environment, but this auto-generation allows you to quickly set up an orchestrator to experiment with).
docker network create squash

docker run -d --network squash \
              --name orchestrator \
              -p 7774:7774 \
              -p 7775:7775 \
              -p 7776:7776 \
              -p 38368:38368 \
              -p 24368:24368 \
              -p 12312:12312 \
              -e SSH_CHANNEL_HOST=the_environment_ip_or_hostname \
              -e SSH_CHANNEL_USER=user \
              -e SSH_CHANNEL_PASSWORD=secret \
              -e SSH_CHANNEL_TAGS=ssh,linux,robotframework \
              squashtest/squash-orchestrator:4.3.0
You must then deploy the services reserved for Squash AUTOM Premium. Here, you must first retrieve the self-generated token:
docker logs orchestrator 2>&1 \
    | grep --after-context=10 "Creating temporary JWT token"
All you have to do is store this token in an environment variable (here TOKEN) and deploy an instance of the squash-autom-premium image:
export TOKEN=eyJ...
docker run -d --network squash \
              --name premium \
              -e BUS_HOST=orchestrator \
              -e BUS_PORT=38368 -e BUS_TOKEN=$TOKEN \
              -e EXTERNAL_HOSTNAME=premium \
              docker.squashtest.org/squashtest/squash-autom-premium:3.10.0
You can view the logs of these two containers:
docker logs orchestrator
docker logs premium
To delete these two containers, use the following commands:
docker kill orchestrator premium
docker rm orchestrator premium
OpenTestFactory Agent†
Installation
The OpenTestFactory agent is a Python application that is installed in the execution environment. It requires Python 3.7 or higher. It works on Linux, macOS, and Windows.
The agent is a simple script. It only has one external dependency, the well known requests Python library (it will be installed if not already present on the execution environment).
To install the agent from PyPI, use the following command:
pip install --upgrade opentf-agent
You can test your installation by running the following command:
opentf-agent --help
Usage
Summary
$ opentf-agent --help
usage: opentf-agent [-h] --tags TAGS --host HOST [--port PORT] [--path_prefix PATH_PREFIX] [--token TOKEN] [--encoding ENCODING] [--script_path SCRIPT_PATH] [--workspace_dir WORKSPACE_DIR] [--name NAME] [--polling_delay POLLING_DELAY] [--liveness_probe LIVENESS_PROBE] [--retry RETRY] [--debug]

OpenTestFactory Agent

optional arguments:
  -h, --help            show this help message and exit
  --tags TAGS           a comma-separated list of tags (e.g. windows,robotframework)
  --host HOST           target host with protocol (e.g. https://example.local)
  --port PORT           target port (default to 24368)
  --path_prefix PATH_PREFIX
                        target context path (default to no context path)
  --token TOKEN         token
  --encoding ENCODING   encoding on the console side (defaults to utf-8)
  --script_path SCRIPT_PATH
                        where to put temporary files (defaults to current directory)
  --workspace_dir WORKSPACE_DIR
                        where to put workspaces (defaults to current directory)
  --name NAME           agent name (defaults to "test agent")
  --polling_delay POLLING_DELAY
                        polling delay in seconds (default to 5)
  --liveness_probe LIVENESS_PROBE
                        liveness probe in seconds (default to 300 seconds)
  --retry RETRY         how many time to try joining host (default to 5,
                      0 = try forever)
  --debug               whether to log debug informations.
Example
Assuming there is a Squash Orchestrator running on orchestrator.example.com, with a known token stored in the TOKEN environment variable, the following command will register the Windows-based execution environment and will possibly receive commands from Squash Orchestrator targeting windows and/or robotframework tagged environments:
chcp 65001
opentf-agent --tags windows,robotframework --host http://orchestrator.example.com/ --token %TOKEN%
The agent will poll the Orchestrator every 5 seconds, and will execute the received commands.
The chcp command sets the console to Unicode. It is Windows-specific. It is not mandatory but may be needed depending on the test framework available in the execution environment.
Details
A complete description of the agent is available in the OpenTestFactory documentation.
Execution environments†
Some test technologies require that some particular components are installed in the execution environment, these ones are indicated in the pages describing the specificities of each technology.
Squash TM plugins
Installation
For details on the installation, please refer to the installation protocol of a Squash TM plugin.
| Plugin | Squash TM version | Compatible plugin version | Download latest Community version | Download latest Premium version‡ |
|---|---|---|---|---|
| Result Publisher† | 2.2.0, or later 2.X.Y | 2.2.X | 2.2.0: .tar.gz or .zip | 2.2.0: .tar.gz or .zip |
| 3.0.0, or later 3.X.Y | 3.0.X | 3.0.0: .tar.gz or .zip | 3.0.0: .tar.gz or .zip | |
| 4.0.0, or later 4.0.X | 4.0.X | 4.0.0: .tar.gz or .zip | 4.0.0: .tar.gz or .zip | |
| 4.1.0, or later 4.X.Y | 4.1.X | 4.1.0: .tar.gz or .zip | 4.1.0: .tar.gz or .zip | |
| 5.0.0, or later 5.X.Y | 5.0.X | 5.0.0: .tar.gz or .zip | 5.0.0: .tar.gz or .zip | |
| Squash AUTOM | 2.2.0, or later 2.X.Y | 2.2.X | 2.2.0: .tar.gz or .zip | 2.2.0: .tar.gz or .zip |
| 3.0.0, or later 3.X.Y | 3.0.X | 3.0.0: .tar.gz or .zip | 3.0.0: .tar.gz or .zip | |
| 4.0.0, or later 4.0.X | 4.0.X | 4.0.1: .tar.gz or .zip | 4.0.1: .tar.gz or .zip | |
| 4.1.0, or later 4.X.Y | 4.1.X | 4.1.0: .tar.gz or .zip | 4.1.0: .tar.gz or .zip | |
| 5.0.0, or later 5.X.Y | 5.0.X | 5.0.0: .tar.gz or .zip | 5.0.0: .tar.gz or .zip | |
| Git Connector | 2.2.0, or later 2.X.Y | 2.1.X | 2.1.0: .tar.gz or .zip | no Premium version |
| 3.0.0, or later 3.X.Y | 3.0.X | 3.0.0: .tar.gz or .zip | ||
| 4.0.0, or later 4.X.Y | 4.0.X | 4.0.0: .tar.gz or .zip | ||
| 5.0.0, or later 5.X.Y | 5.0.X | 5.0.0: .tar.gz or .zip | ||
| Actions Library | 2.2.0, or later 2.X.Y | 2.0.X | no Community version | 2.0.0: .tar.gz or .zip |
| 3.0.0, or later 3.X.Y | 3.0.X | 3.0.0: .tar.gz or .zip | ||
| 4.0.0, or later 4.X.Y | 4.0.X | 4.0.0: .tar.gz or .zip | ||
| 5.0.0, or later 5.X.Y | 5.0.X | 5.0.0: .tar.gz or .zip | ||
| Jira Automation Workflow | 2.2.0, or later 2.X.Y | 2.0.X | no Community version | 2.0.0: .tar or .zip |
| 3.0.0, or later 3.X.Y | 3.0.X | 3.0.0: .tar or .zip | ||
| 4.0.0, or later 4.X.Y | 4.0.X | 4.0.0: .tar or .zip | ||
| 5.0.0, or later 5.X.Y | 5.0.X | 5.0.0: .tar or .zip |
Squash TM configuration
Warning
Squash AUTOM requires that the public URL of Squash TM is defined (see Squash TM documentation).
Squash Orchestrator server declaration
In order to manually launch an execution plan from Squash TM, the Squash Orchestrator that will execute the automated tests in the suitable environments has to be declared.
It is done in the Automation servers space of the Administration:
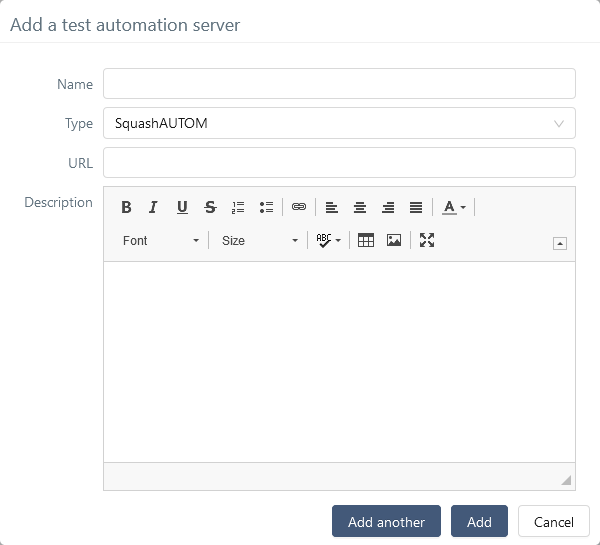
-
Name: The name of the server, as it will appear in the Test Case workspace. -
Type: Select squashAutom in the dropdown list. -
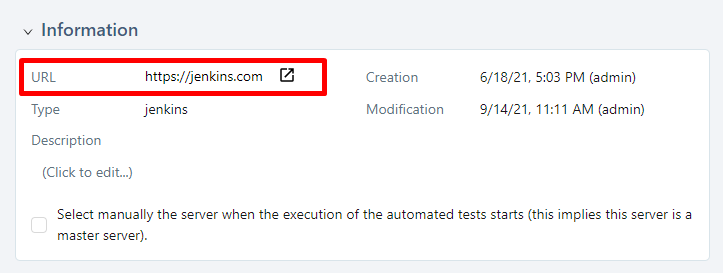
Url: The address of the Squash Orchestrator Receptionist.
The Receptionist URL is displayed on the server page:
Warning
The Squash Orchestrator observer must be accessible by the same URL as the Receptionist.
The Squash Orchestrator event bus must be accessible by the same URL as the Receptionist, on port 38368.
Starting with Squash TM 4.0, in the case where the URLs of the Receptionist and of the Observer are different (for example if the Squash Orchestrator is not located behind a reverse-proxy), it is possible to declare both:
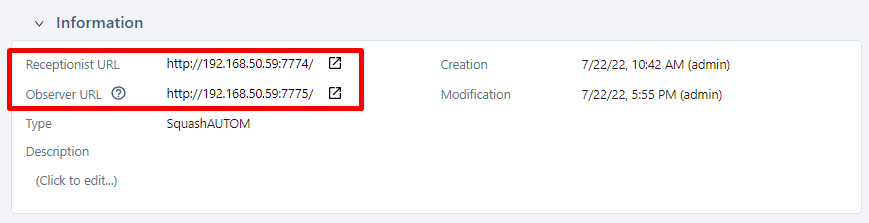
Warning
The Squash Orchestrator event bus must be accessible by the same URL as the Receptionist, on port 38368.
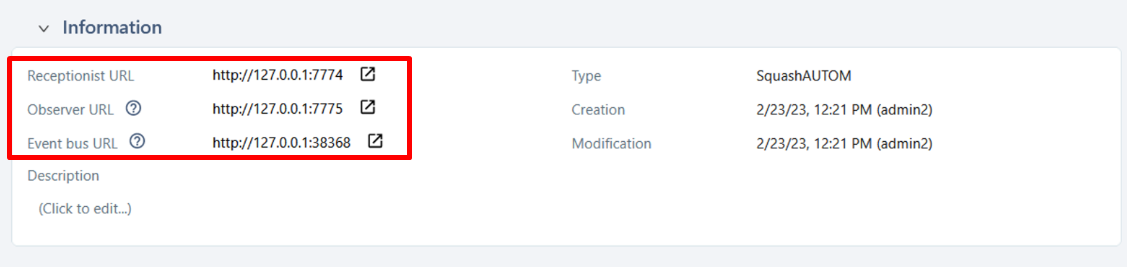
Starting with Squash TM 5.0, in the case where the URLs of the Receptionist, of the Observer, or of the Event Bus are different (for example if the Squash Orchestrator is not located behind a reverse-proxy), it is possible to declare the three values:
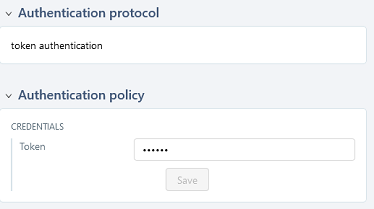
Once the server is created, you must set an authentication token.
Trouble shooting - Accessibility of Squash Orchestrator
It is possible to check that the connection to the Squash Orchestrator (from the server hosting Squash TM) works correctly by querying it, for example by asking for the list of execution environments:
curl --header "Authorization: bearer <token>" <Observer URL>/channels
<token>is the Squash Orchestrator authentication token.<Observer URL>is the Observer URL.
The response should be something like the following:
{"apiVersion":"v1","code":200,"details":{"items":[{"apiVersion":"opentestfactory.org/v1alpha1","kind":"Channel","metadata":{"channelhandler_id":"907f43e2-b5a0-4594-a1c7-31f6bf667b38","name":"dummy.example.com","namespaces":"default"},"spec":{"tags":["ssh","linux"]},"status":{"currentJobID":null,"lastCommunicationTimestamp":"2022-09-16T12:18:01.640489","phase":"IDLE"}}]},"kind":"Status","message":"Known channels","metadata":{},"reason":"OK","status":"Success"}
The Squash TM docker image does not contain curl. You can use wget instead:
docker exec <Squash TM container> wget --header="Authorization: bearer <token>" -O - <Observer URL>/channels
<Squash TM container>is the name of the container.<token>is the Squash Orchestrator authentication token.<Observer URL>is the Observer URL.
The response should be something like the following:
Connecting to 172.17.0.1:7775 (172.17.0.1:7775)
writing to stdout
-                    100% |********************************|   464  0:00:00 ETA
written to stdout
{"apiVersion":"v1","code":200,"details":{"items":[{"apiVersion":"opentestfactory.org/v1alpha1","kind":"Channel","metadata":{"channelhandler_id":"907f43e2-b5a0-4594-a1c7-31f6bf667b38","name":"dummy.example.com","namespaces":"default"},"spec":{"tags":["ssh","linux"]},"status":{"currentJobID":null,"lastCommunicationTimestamp":"2022-09-16T12:18:01.640489","phase":"IDLE"}}]},"kind":"Status","message":"Known channels","metadata":{},"reason":"OK","status":"Success"}
Squash TM project configuration
Once an automation server has been declared, it needs to be linked to a Squash TM Project in order to be used for the project's automated tests execution.
In order to do that, follow these steps:
-
Click on
[Administration], then click on[Projects]. -
Select an existing project, scroll down to
Test automation management.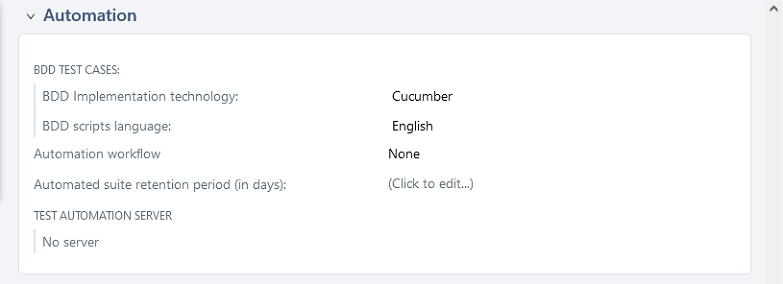
-
Click on
No server. You will see the list of available servers.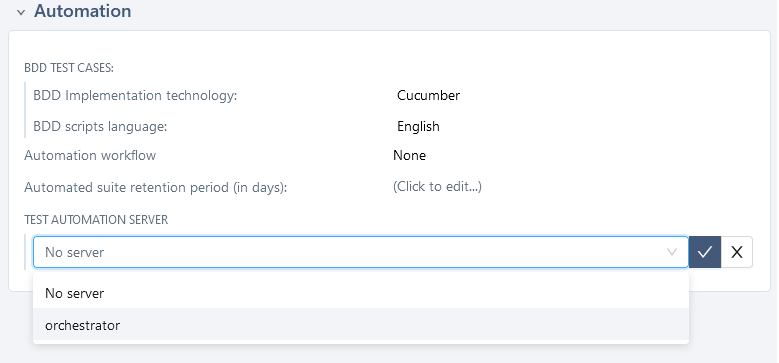
-
Choose the server and confirm.